Easter brings such a wonderful opportunity for creativity, especially in the kitchen. There is something truly special about crafting homemade treats for loved ones. If you are searching for inspiring diy easter candy molds ideas, you have come to the right place. I am excited to share a simple yet stunning method for making vibrant, glass-like hard candies using silicone molds. This article will guide you through our unique stained-glass marble swirl technique, ensuring your homemade confections are both beautiful and delicious, perfect for any Easter basket. If you’re looking for more fun, no-bake ideas, try these Easy Bunny Oreo Balls too!
Why You’ll Love This Recipe
This recipe introduces a truly unique twist: the Stained-Glass Marble Swirl. It is a technique that elevates simple hard candy into an artisan confection. By intentionally mixing two complementary colors of crushed hard candy, such as a delicate pink with a crisp white, or a cheerful blue with a sunny yellow, and then gently swirling the molten sugar with a toothpick just before it sets, you can achieve a professional marbled look. This magic happens because the viscosity of melted hard candy at 250 degrees Fahrenheit is just right. It allows the colors to meld into stunning patterns without immediately muddling or fully blending together, creating a beautiful stained-glass effect.
Visually Stunning: You will achieve a professional, artisan look perfect for gifting or display.
Super Easy and Fun: This is a rewarding DIY project perfect for all skill levels, making it great for families to enjoy together.
Customizable: There are endless color and flavor combinations using readily available hard candies like Jolly Ranchers.
Budget-Friendly: It is an affordable way to create impressive Easter basket stuffers or party favors without much expense. These candies, much like Divine No-Bake Carrot Cake Truffles, offer a delicious and visually appealing option for any celebration.
Ingredients Needed

- 1-2 Bags Jolly Ranchers
- Sandwich Bags
- Rolling Pin
- Silicone Molds
- Baking Sheet
Ingredient Notes & Substitutions
Jolly Ranchers or Hard Candy: Any brand of hard candy works wonderfully for this recipe, but I find that Jolly Ranchers are popular for their vibrant colors and consistent melting properties. If you are looking for a dietary-friendly option, sugar-free varieties can also be used with excellent results. For the best color integrity and distinct swirls, I always emphasize sorting your candies by flavor before you begin crushing them.
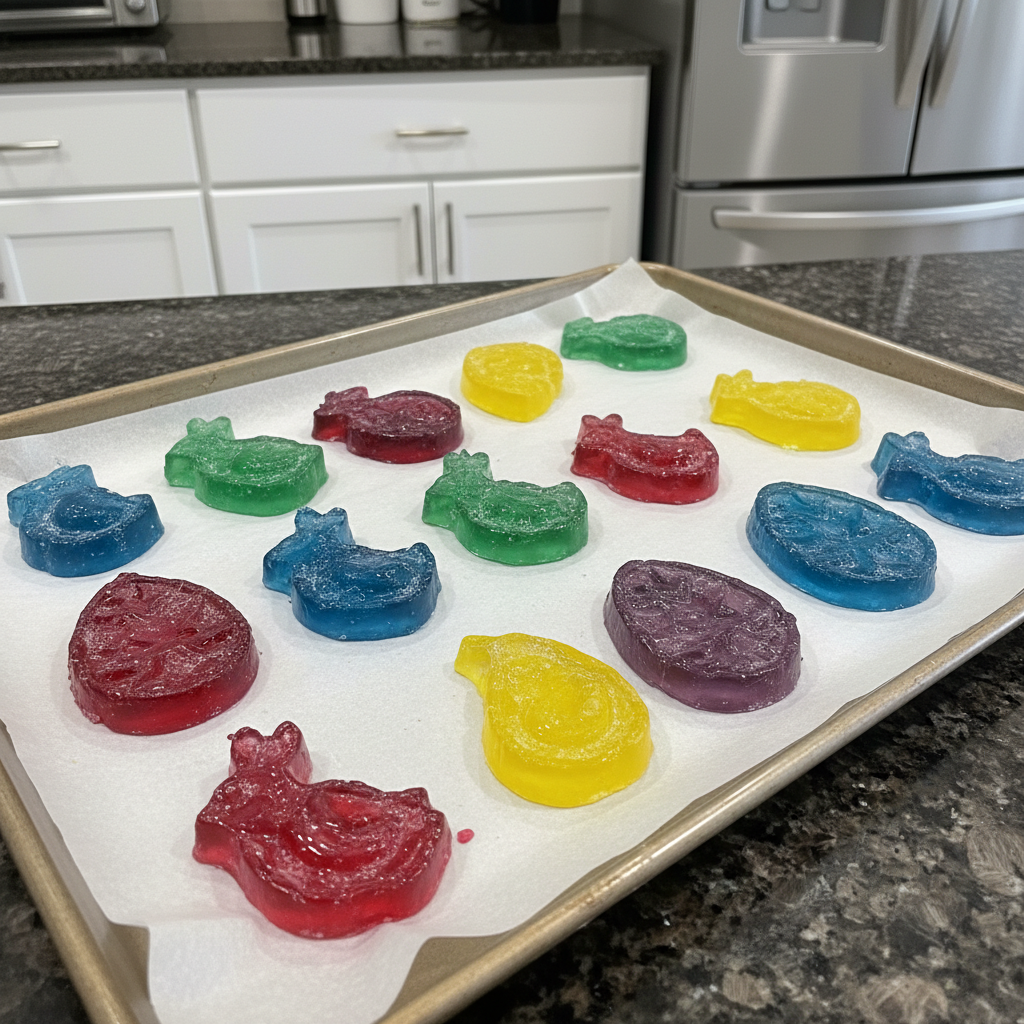
Silicone Molds: It is absolutely essential to use food-grade silicone molds for this project. When working with the melting point of hard candy, you need molds that are specifically oven-safe, rated up to 250 degrees Fahrenheit or higher. This is crucial to prevent any damage to your molds or potential off-gassing. Make sure to differentiate these from silicone molds intended only for cold applications, such as chocolate or ice molds. For Easter, I love using festive shapes like bunnies, eggs, or chicks to add to the holiday charm and complement other easy Easter treats.
Rolling Pin: If you do not have a rolling pin on hand, a meat mallet or even a sturdy, heavy can can work just as well for crushing the candy.

How to Make DIY Easter Hard Candy Molds (Step-by-Step)
Prepare Your Workspace
First, preheat your oven to 250 degrees Fahrenheit. This optimal temperature is crucial for the slow, even melting of your hard candy without excessive bubbling, which ensures a clear and smooth finish.
Sort and Crush the Candy
Then unwrap the Jolly Ranchers. I love seeing the colorful assortment spread out before sorting! Place each flavor in a separate sandwich bag and seal it securely. This step helps maintain distinct colors for your stained-glass effect. Use a rolling pin to crush the Jolly Ranchers inside the sandwich bags into smaller pieces. This part can be quite satisfying! Crushing the candy into a fine powder or small shards is critical because it allows the sugar to flow into narrow mold details and helps prevent unsightly air pockets.
Fill the Molds
Place your Easter silicone molds on a baking sheet. Always place your molds on a rigid baking sheet before filling to prevent spills and make transferring them to the oven much easier. Use a spoon to scoop the crushed Jolly Ranchers into the silicone molds. Be careful not to overfill them.
Bake and Swirl
Bake the Jolly Ranchers for 5-10 minutes or until fully melted. Watch them carefully; the candy should appear fully liquid and glossy, but not bubbling excessively. Carefully remove the baking sheet from the oven. If you desire the beautiful ‘Stained-Glass Marble Swirl’ effect, gently use a toothpick to swirl the molten sugar in the molds for about 1-2 minutes. Strategically mix two complementary colors, for example, pink and white, or blue and yellow, if you layered them. This technique skillfully uses the sugar’s viscosity to create stunning marble patterns without muddying the colors. Then, let cool to room temperature.
Cool and Demold
Remove them from the oven and let cool completely to room temperature. You will notice the candy firming up and becoming less sticky. Allow at least 20-30 minutes for thinner molds, and up to an hour or more for thicker ones, to ensure they are fully set. Remove the Easter candy from the silicone mold and enjoy! Gently flex the silicone molds to release your vibrant, glass-like candies without breaking them. Admire their crunchy texture and sparkling appearance.
Choosing & Caring for Your Silicone Molds
Proper mold selection and care are key to successful DIY Easter candy molds. Understanding the nuances of silicone molds will save you time and prevent disappointment.
Oven-Safe Silicone: What to Look For
There is a critical difference between food-grade, oven-safe silicone molds and those intended solely for cold applications. Our recipe requires molds that are safe for oven temperatures up to at least 250 degrees Fahrenheit. Always check the manufacturer’s specifications on your silicone molds, or look for symbols that clearly indicate oven-safety. Using non-oven-safe molds at high temperatures can lead to several problems, including the mold melting, potential chemical leaching into your candy, and even affecting the taste of your delicious homemade treats.
Cleaning Hardened Sugar from Molds
Hardened sugar residue can be quite stubborn, but cleaning your silicone molds is simpler than you might think. For tough spots, soak the molds in very hot or even boiling water for several minutes. This will effectively soften and dissolve the sugar, making it easy to wipe away. Afterward, gently scrub with a soft brush or sponge, making sure to avoid abrasive cleaners that could damage the silicone. Proper cleaning not only prolongs the life of your molds but also ensures food safety for future confectionery creations.
Pro Tips & Troubleshooting for Perfect Hard Candies
Pro Tips
Precision Crushing: Crushing hard candy into a fine powder or small shards is the only way to ensure the sugar flows into narrow mold details like bunny ears or feet. This prevents frustrating air pockets and guarantees crisp, perfectly formed details.
Baking Sheet Security: Always place silicone molds on a rigid baking sheet before filling. This simple step prevents spilling when moving them to and from the oven and aids in even heat distribution for consistent melting.
Color Sorting: Sort your hard candies by flavor before crushing to maintain vibrant, distinct colors. This is especially key for achieving the beautiful Stained-Glass Marble Swirl effect.
Controlled Swirl: To execute the unique twist perfectly, use a very thin toothpick and swirl gently for only a short period, about 1-2 minutes. This creates distinct marbling without fully blending the colors into a muddy mess.
Experiment with Inclusions: Get creative! Try mixing crushed clear hard candies with a touch of edible glitter for a shimmering, magical look. You can also layer different colors for a captivating ombre effect.
Common Mistakes to Avoid
Whole Candies in Molds: A common mistake is placing whole candies directly into detailed molds. This often results in air pockets and incomplete shapes. Always crush your candy first!
Overbaking: Overbaking at high temperatures can cause the sugar to bubble excessively and create a cloudy, porous texture rather than a smooth, clear finish. Monitor your candy carefully and remove it as soon as it appears glossy and fully melted.
Premature Demolding: Trying to remove candies before they are completely cooled to room temperature is a recipe for deformation and stickiness. Patience is key for crisp, intact shapes.
Dirty Molds: Using uncleaned molds can surprisingly impart off-flavors to your candy or affect its surface texture. Always start with sparkling clean molds.
Serving & Storage
Serving Ideas
Easter Basket Fillers: These delightful candies make perfect Easter basket stuffers. Wrap individual candies in clear cellophane bags tied with pastel ribbons for an elegant touch.
Cupcake Toppers: Elevate your Easter-themed cupcakes by placing these charming candy bunnies or eggs right on top.
Drink Garnish: Smaller shapes can be used as edible ‘charms’ for a festive and fun Easter-themed drink garnish.
Edible Decor: Arrange them artfully on a platter as a colorful and inviting centerpiece for your Easter celebration.
Storage and Make-Ahead
Preventing Stickiness: Hard candy becomes extremely sticky in high-humidity environments. To preserve their beautiful glass-like texture and prevent them from melting together, store your cooled, set candies in airtight containers. For best results, include food-grade desiccant packs, like clearly labeled silica gel packets, to absorb any excess moisture.
Shelf Life: When stored correctly in an airtight, low-humidity environment, your homemade hard candies can last for several weeks. Avoid refrigerating them, as this can introduce moisture and cause stickiness.
Make-Ahead: These candies are absolutely perfect for making ahead of time for your Easter celebrations, thanks to their excellent shelf life when properly stored.
Conclusion
Creating your own DIY Easter candy molds is a truly joyful and rewarding project. With the stunning visual appeal of the Stained-Glass Marble Swirl technique, you can easily craft homemade treats that look professionally made. Even if you are a beginner, the detailed guide and tips I have provided will help you achieve impressive results. So, gather your Jolly Ranchers, find some charming silicone molds, and get creative! Experiment with different colors, flavors, and mold shapes, perhaps even adding a touch of edible glitter for extra sparkle. I would love to see your creations, so feel free to share your favorite candy combinations or photos of your Easter candy art!
FAQ
Q: What is the best temperature to melt Jolly Ranchers in the oven?
A: The optimal temperature is 250 degrees Fahrenheit (120 degrees Celsius). This low, steady heat ensures the candies melt evenly without bubbling, resulting in a clear, smooth finish.
Q: How do you keep DIY hard candy from sticking to your hands?
A: Proper cooling is key. Ensure the candies are completely cool and firm before handling. For serving and storage, place them in airtight containers, ideally with food-grade desiccant packs, to prevent moisture absorption which causes stickiness.
Q: Can you reuse silicone candy molds for non-food DIY projects?
A: While technically possible, it is generally recommended to dedicate food-grade silicone molds strictly for food use to avoid cross-contamination with non-food chemicals or residues. If you do reuse them for other projects, ensure thorough cleaning and clearly distinguish them from your food-only molds.
Q: Why should I crush the candy instead of melting it whole?
A: Crushing candies into small shards or powder is crucial. It ensures the sugar flows into all the intricate details of your molds, like bunny ears, and helps prevent air pockets. This leads to perfectly formed, smooth candies. Whole candies often trap air and result in incomplete shapes.
Q: How long do I need to let the candy cool before popping it out?
A: Allow the candy to cool completely to room temperature. This typically takes 20-30 minutes for thinner molds and up to an hour or more for thicker ones. Rushing this step will result in deformed or sticky candies.
Q: Why did my candy have bubbles in it?
A: Bubbles often occur due to overbaking or melting at too high a temperature. Keeping the oven at 250 degrees Fahrenheit and removing the candies as soon as they are fully melted helps achieve a smooth, glass-like texture. Crushing the candy finely also minimizes trapped air.
Q: Is 250 degrees safe for all silicone molds?
A: While 250 degrees Fahrenheit is a relatively low oven temperature, it is crucial to use only food-grade, oven-safe silicone molds that are rated for this temperature or higher. Always check your mold’s manufacturer specifications to ensure it can withstand the heat safely and avoid potential melting or chemical release.
DIY Easter Candy Molds: Stained-Glass Swirls for Spring
Ingredients
Equipment
Method
- First, preheat your oven to 250 degrees Fahrenheit (120 degrees Celsius). This optimal temperature is crucial for the slow, even melting of your hard candy without excessive bubbling, ensuring a clear and smooth finish.
- Unwrap the Jolly Ranchers. Place each flavor in a separate sandwich bag and seal it securely. This step helps maintain distinct colors for your stained-glass effect.
- Use a rolling pin to crush the Jolly Ranchers inside the sandwich bags into smaller pieces. Crushing the candy into a fine powder or small shards is critical because it allows the sugar to flow into narrow mold details and helps prevent unsightly air pockets.
- Place your Easter silicone molds on a baking sheet. Always place your molds on a rigid baking sheet before filling to prevent spills and make transferring them to the oven much easier.
- Use a spoon to scoop the crushed Jolly Ranchers into the silicone molds. Be careful not to overfill them.
- Bake the Jolly Ranchers for 5-10 minutes or until fully melted. Watch them carefully; the candy should appear fully liquid and glossy, but not bubbling excessively.
- Carefully remove the baking sheet from the oven. If you desire the beautiful 'Stained-Glass Marble Swirl' effect, gently use a toothpick to swirl the molten sugar in the molds for about 1-2 minutes. Strategically mix two complementary colors, for example, pink and white, or blue and yellow, if you layered them. Then, let cool to room temperature.
- Remove them from the oven and let cool completely to room temperature. Allow at least 20-30 minutes for thinner molds, and up to an hour or more for thicker ones, to ensure they are fully set.
- Gently flex the silicone molds to release your vibrant, glass-like candies without breaking them. Admire their crunchy texture and sparkling appearance.