Easter morning, with its bright colors and joyful spirit, always brings a smile to my face. As a chef, I love creating treats that capture that festive feeling, and nothing says spring like a classic reinvented. This year, I am excited to share my absolute favorite way to make easy, fun-to-make treats: irresistible rice krispies easter egg treats molded to perfection. For more delightful no-bake Rice Krispies creations, be sure to check out our ultimate Rice Krispy Millionaires Bars. This recipe is designed to be straightforward for everyone, promising both clear, easy-to-follow steps and invaluable tips for perfect results. You will learn how to craft beautifully shaped, deliciously chewy Rice Krispies Easter eggs with a special flavor twist that elevates them far beyond the ordinary. Prepare to delight your family and friends with the magic of browned butter and a hint of sea salt.
Why You’ll Love This Recipe
My unique twist to these classic treats is what truly makes them special. I incorporate browned butter and a pinch of fine sea salt into the base marshmallow mixture. This simple step creates a depth of flavor that is genuinely transformative.
Browning the butter is more than just melting it. It is a process that unleashes the Maillard reaction, developing rich, toasted, and nutty notes. These complex flavors cut beautifully through the intense sweetness of the marshmallows, creating a more balanced and sophisticated treat. The fine sea salt acts as a counterpoint, not only balancing the sugar but also enhancing the natural malted flavor of the rice cereal itself. It is a subtle but significant difference that will have everyone asking for your secret.
These treats also come together incredibly quickly, making them perfect for busy holiday preparations. They are a family-friendly activity, offering hands-on fun for all ages, especially when shaping the eggs. The molding technique combined with this unique flavor profile ensures these treats are a standout for Easter baskets, dessert platters, or thoughtful party favors. If you’re looking for another charming no-bake Easter treat, try these easy bunny Oreo balls.
Ingredients Needed

* 15 cups Kellogg’s Rice Krispies Cereal
* 15 tablespoons Butter (We use Salted, Sweet Cream Butter)
* 15 cups Mini Marshmallows
* Wilton Color Right Food Coloring
Ingredient Notes & Substitutions
For these special spring desserts, choosing the right ingredients makes a difference.
Rice Krispies Cereal: I always recommend Kellogg’s Rice Krispies Cereal for its consistent crisp texture and classic flavor. However, feel free to use your favorite crispy rice cereal if Kellogg’s is not available. The key is a fresh box for maximum crunch.
Butter (Salted Sweet Cream Butter): The salted butter is crucial here. Its salt content interacts beautifully with the browned butter process and balances the sweetness. While unsalted butter can work, you might need to adjust the added sea salt slightly to achieve the same balance. For those with dietary restrictions, vegan butter sticks can be a suitable dairy-free alternative, though the browning process might differ slightly.
Mini Marshmallows: Mini marshmallows melt much more smoothly and quickly than larger marshmallows, resulting in a perfectly even, malleable mixture. You will typically need about two large bags or several smaller bags to reach 15 cups. Melting consistency is key for easy molding.
Food Coloring: For vibrant, true-to-life colors without diluting your mixture, I strongly advise using gel coloring, specifically Wilton Color Right Food Coloring. Liquid food colorings can sometimes create a splotchy appearance and add too much moisture. Gel coloring provides concentrated color with just a few drops.
Salt (for the unique twist): Remember the fine sea salt mentioned in my unique twist section. It is essential for enhancing all the flavors and providing that perfect balance against the marshmallow sweetness. Do not skip it.

How to Make Rice Krispies Easter Egg Treats Molded
Creating these molded Rice Krispies Easter egg treats is a delightful process, and I am here to guide you through each step. We will work in small batches to manage colors and maintain the perfect malleable texture.
Browning the Butter and Melting Marshmallows
First, take 3 tablespoons of salted sweet cream butter and melt it in a medium pan over medium-low heat. Continue cooking the butter, stirring occasionally, until it turns a rich amber color and you smell a distinct nutty aroma. This is the Maillard reaction in action, creating those wonderful toasted notes. Watch it closely, as it can go from perfectly browned to burnt quickly.
Once the butter is beautifully browned, immediately reduce the heat to low. Add 3 cups of mini marshmallows to the pan. Stir continuously until the marshmallows are completely melted and smooth. The key here is low heat; rushing this step or using high heat can cause your treats to become hard and brittle later.
Coloring and Mixing the Cereal
Take the pan off the heat as soon as the marshmallows are melted. Now, it is time to add your food coloring. Add a few drops of Wilton Color Right gel coloring and mix it thoroughly into the melted marshmallow mixture. Ensuring the color is evenly distributed now, before adding the cereal, prevents splotchy colors in your final Easter eggs.
Next, add 3 cups of Rice Krispies Cereal to the colored marshmallow mixture. Stir until every piece of cereal is completely covered with the glossy, colorful marshmallow. You want a uniform coating for the best texture and appearance.
Cooling and Hand-Shaping the Eggs
Allow the Rice Krispie mixture to cool slightly. This step is crucial. The mixture needs to be cool enough to handle comfortably without burning your hands, but still warm and malleable enough to shape easily. If it cools too much, it will become brittle and difficult to mold.
To prevent stickiness, lightly coat your hands with a little butter or cooking spray. Grab a handful of the Rice Krispie treat mixture, about 0.5 ounces for a consistent egg size. Then, use your hands to gently but firmly form the Easter eggs. Work quickly while the mixture is still warm and flexible.
Once shaped, place your Rice Krispie eggs on a piece of parchment paper or a greased baking sheet to cool completely. This allows them to set and firm up.
Repeating for Multiple Colors
Repeat this entire process for the other four Easter egg colors you wish to create. Working in small batches ensures each color is vibrant and each egg is perfectly shaped.
Mastering the Mold: Shaping Perfect Rice Krispies Easter Eggs
Achieving perfectly smooth, uniformly shaped Easter eggs is simple with the right technique, especially when using molds. This method takes your rice krispies easter egg treats molded creations to the next level.
Choosing and Preparing Your Molds
For molding, I find that hinged plastic Easter eggs work wonderfully, or you can use silicone molds specifically designed for eggs or other fun shapes. Plastic egg molds are readily available during the spring season and come in various sizes.
Before you begin, proper preparation of your molding tools and your hands is key to preventing stickiness. Lightly grease the inside of your plastic egg molds with butter or a quick spray of cooking spray. Similarly, lightly butter or spray your hands. This creates a non-stick surface that will make shaping and removal much easier.
The Molding Technique
With your molds prepared and your Rice Krispie mixture still warm and malleable, begin the molding process. Take a portion of the mixture—I recommend measuring about 0.5 ounces for consistent sizing—and press it firmly but gently into one half of a plastic egg mold. Fill both halves in this manner.
Once both halves are filled, carefully press them together. Apply gentle, even pressure to ensure the mixture adheres and forms a seamless egg shape. The warmth of the mixture will help the two halves fuse.
Allow the molded egg to sit in the mold for just a minute or two to cool slightly and firm up. Then, carefully open the mold and gently remove your perfectly shaped Rice Krispies Easter egg. Handle it with care to avoid damaging its pristine form.
Beyond the Basic Egg: Creative Twists & Customization
While these molded rice krispies easter egg treats are delightful on their own, a few creative twists can make them even more special. For another festive and flavorful no-bake option, consider our divine no-bake carrot cake truffles.
Hidden Surprises
Imagine the delight of biting into an Easter egg and finding a sweet surprise inside. This is an easy and fun addition. While molding your eggs, press a small indentation into the center of one half of the Rice Krispie mixture. Place a small treat like a jelly bean, a miniature chocolate egg, or a few colorful sprinkles into this space. Then, carefully press the other half of the Rice Krispie mixture on top and mold as usual, ensuring the surprise is fully enclosed.
Decorating Your Eggs
Once your molded eggs have fully cooled and set, the decorating possibilities are endless. You can drizzle them with melted white or dark chocolate, which adds both visual appeal and another layer of flavor. Edible glitter or a variety of spring-themed sprinkle toppings can add a festive sparkle. For more intricate designs, a little royal icing can be used to pipe delicate patterns.
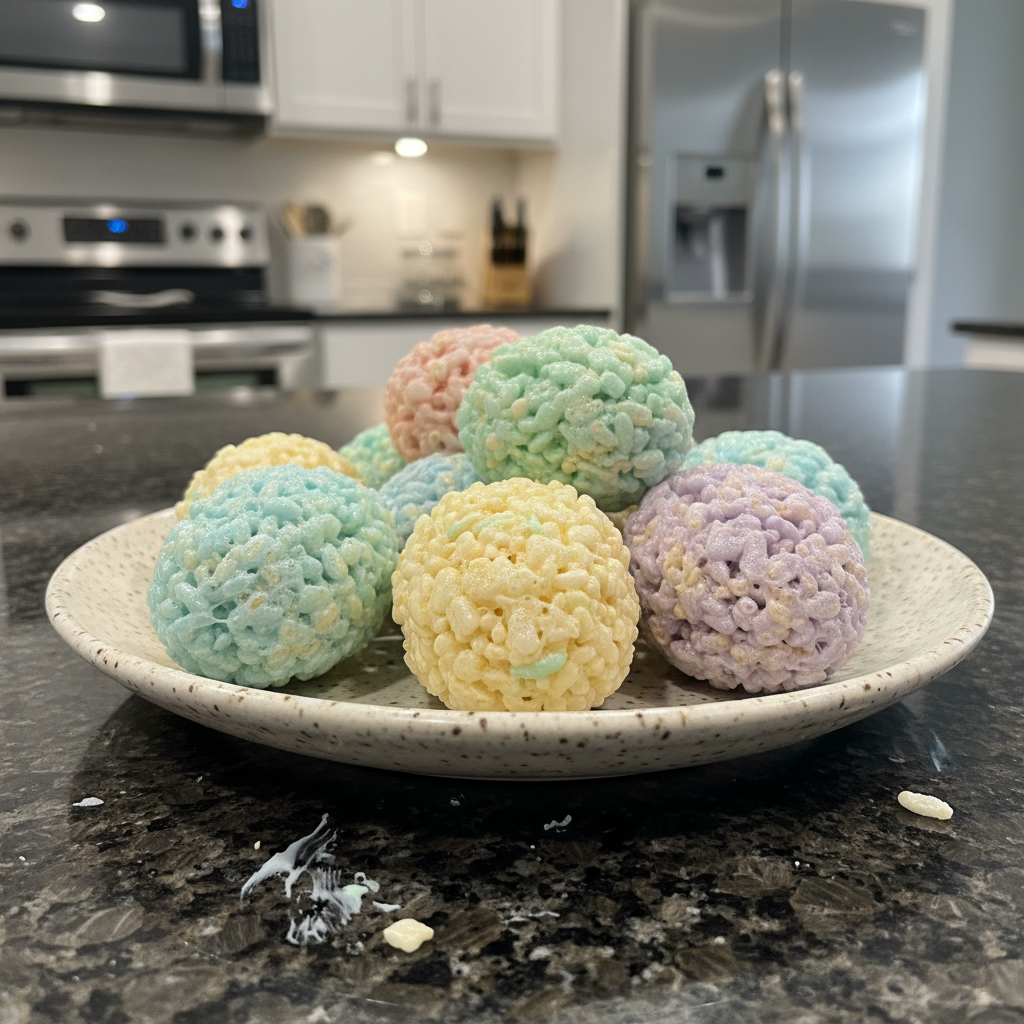
Achieving Vibrant Pastel Colors
To create that quintessential Easter palette, I love using specific formulas for gel coloring. For pastel yellow, a single drop of yellow gel is usually enough. For a soft pink, use one drop of red gel coloring. A lovely pastel purple can be achieved with one drop of red and one drop of blue gel. For spring green, use one drop of green gel coloring. And for a beautiful teal or light blue, use two drops of blue and one drop of green. Remember, achieving a pure blue can be challenging due to the natural yellowish tint of the cereal and marshmallows, so a teal often works best.
Pro Tips & Troubleshooting
Making these treats is fun, but a few expert insights can ensure your success.
Pro Tips
* For even color distribution, always add food coloring to the melted marshmallow mixture before incorporating the Rice Krispies cereal. This prevents splotchy results.
* To ensure consistent sizing of your Easter eggs, use a small kitchen scale. Measuring approximately 0.5 ounces (about 14 grams) of the mixture per egg will give you uniform treats.
* Prevent stickiness by lightly rubbing your fingers with butter or cooking spray when hand-shaping or molding the treats. This makes the process much more pleasant.
* Maintain malleability by working quickly while the mixture is still warm. It should be cool enough to handle, but warm enough to easily mold without becoming brittle.
* The browned salted butter not only adds incredible depth of flavor but also slightly affects the mixture’s handling compared to regular butter. Allow it to cool for just a moment before adding marshmallows, but do not let it solidify.
* When aiming for a blue color, be aware that the natural yellow hue of the cereal can make pure blue difficult to achieve. A teal or a very light blue often turns out best.
Common Mistakes to Avoid
* Splotchy color is a common issue if you add the cereal before the food coloring is fully mixed into the marshmallows. Always color first.
* Brittle treats occur if you wait too long to shape the mixture. Marshmallows set quickly as they cool, so work efficiently while the mixture is still warm and pliable.
* Soggy treats can result from storing them before they are completely cooled. Any residual warmth can create condensation inside an airtight container.
* Hard treats are often a result of melting marshmallows over too high a heat. Always use low heat to gently melt them, as high heat can make them tough.
* If your marshmallows are not melting, ensure your heat is truly low and consistent. If the cereal is not sticking, your marshmallow mixture might have cooled too much before the cereal was added, or it was not mixed thoroughly enough.
Serving & Storage
Once your beautiful rice krispies easter egg treats molded are complete, it is time to enjoy them or prepare for later.
Serving Ideas
These Easter eggs are not just delicious, they are incredibly versatile for presentation. You can arrange them in a decorative Easter basket with edible grass for a charming centerpiece. Or, for a different kind of no-bake spring dessert, consider making elegant strawberry shortcake cups. Consider including them as part of an Easter dessert charcuterie board, adding a pop of color and texture. For party favors or thoughtful gifts, wrap individual eggs in cellophane with a festive ribbon. They are sure to bring smiles.
Storage and Make-Ahead
These molded treats stay delightfully fresh for about 3 days when stored properly. To maintain their chewy texture and flavor, place your spring desserts in an airtight container at room temperature. Avoid refrigerating them, as the cold can cause them to harden.
Yes, you can absolutely make these ahead of time for Easter Sunday. Prepare them 1-2 days in advance and store them as directed.
You can also freeze molded Rice Krispie treats. Wrap individual treats tightly in plastic wrap, then place them in a freezer-safe airtight container or bag. They will keep well for up to 6 weeks. When you are ready to enjoy them, thaw them at room temperature for a few hours. This method ensures they retain their wonderful texture.
Conclusion
I hope you are as excited as I am to make these browned butter rice krispies easter egg treats molded. They are incredibly easy to prepare and yield a truly delicious result. The unique flavor profile, thanks to the browned butter and sea salt, elevates the classic treat to something truly special. Even if you are a beginner in the kitchen, success is absolutely achievable with this recipe, making it a perfect and fun activity for Easter. Do not hesitate to try out some of the creative variations or serving ideas I have shared. I would love to see your beautiful creations! Share your pictures with me or leave a comment below to let me know how they turned out. Happy Easter and happy baking!
FAQ
How do I use plastic eggs to mold these treats?
To use plastic eggs as molds, lightly grease the inside of each half with butter or cooking spray. Press the warm, malleable Rice Krispie mixture firmly into both halves, then gently press the halves together to seal. Allow to cool slightly before carefully opening the mold to remove your shaped egg.
Why are my Rice Krispie eggs falling apart?
Your Rice Krispie eggs might be falling apart if the mixture has cooled too much before shaping, making it brittle. Ensure you work quickly while the mixture is still warm and malleable. Also, make sure you are pressing the mixture firmly enough into the molds or when hand-shaping to create a cohesive bond.
How long do these molded treats stay fresh?
When stored in an airtight container at room temperature, these molded treats stay fresh and delicious for up to 3 days.
Do I need to grease the molds or my hands?
Yes, absolutely! Greasing both the molds and your hands with butter or cooking spray is essential. This prevents the sticky Rice Krispie mixture from adhering, making shaping much easier and preventing mess.
Can I freeze molded Rice Krispie treats?
Yes, you can freeze them. Wrap each molded treat tightly in plastic wrap, then place them in a freezer-safe airtight container or bag. They will keep for up to 6 weeks. Thaw them at room temperature for several hours before serving.
How do I keep Rice Krispie treats from getting hard?
The key to preventing hard Rice Krispie treats is to melt your marshmallows over low heat. High heat can cause the sugar in the marshmallows to overcook, resulting in a tougher treat. Also, avoid overmixing once the cereal is added.
What is the best food coloring for Rice Krispie treats?
Gel food coloring, such as Wilton Color Right, is best for Rice Krispie treats. It provides vibrant colors with only a few drops and does not add extra liquid that could alter the texture of your treats.
Can I use large marshmallows instead of mini ones?
While mini marshmallows are recommended for their ease and speed of melting, you can use large marshmallows. You will need to chop them into smaller pieces to ensure even melting, and the melting time might be slightly longer. The volume equivalent is roughly 1 large marshmallow for every 10-12 mini marshmallows.
Browned Butter Rice Krispies Easter Egg Treats: Molded & Delicious!
Ingredients
Equipment
Method
- In a medium pan over medium-low heat, melt 3 tablespoons of salted sweet cream butter. Continue cooking, stirring occasionally, until the butter turns a rich amber color and develops a distinct nutty aroma. Watch closely to prevent burning.
- Immediately reduce the heat to low. Add 3 cups of mini marshmallows to the pan. Stir continuously until the marshmallows are completely melted and smooth. Ensure low heat to prevent treats from becoming hard and brittle.
- Remove the pan from heat as soon as the marshmallows are melted. Add a few drops of Wilton Color Right gel food coloring and mix thoroughly into the melted marshmallow mixture until evenly distributed.
- Add 3 cups of Rice Krispies Cereal to the colored marshmallow mixture. Stir until every piece of cereal is completely covered with the glossy, colorful marshmallow mixture.
- Allow the Rice Krispie mixture to cool slightly until it's comfortable to handle but still warm and malleable. If it cools too much, it will become brittle.
- Lightly coat your hands with butter or cooking spray to prevent stickiness. Grab about 0.5 ounces of the mixture and gently but firmly form it into an Easter egg shape. Work quickly while the mixture is warm.
- Place the shaped Rice Krispie eggs on parchment paper or a greased baking sheet to cool completely and set.
- Repeat the entire process (browning butter, melting marshmallows, coloring, mixing cereal, shaping) for the other four Easter egg colors you wish to create. Work in small batches to ensure vibrant colors and perfect shaping.
- Choose hinged plastic Easter eggs or silicone molds. Lightly grease the inside of your molds and your hands with butter or cooking spray to prevent stickiness.
- Take about 0.5 ounces of the warm, malleable Rice Krispie mixture and press it firmly but gently into one half of a plastic egg mold. Fill both halves in this manner.
- Carefully press both filled halves of the mold together, applying gentle, even pressure to ensure the mixture adheres and forms a seamless egg shape. The warmth will help them fuse.
- Allow the molded egg to sit in the mold for 1-2 minutes to cool slightly and firm up. Then, carefully open the mold and gently remove your perfectly shaped Rice Krispies Easter egg. Handle with care.