As a chef and home cook, I understand the struggle of making chicken that stays juicy, especially when you are preparing meals in advance. Too often, our best intentions for healthy meal prep result in dry, stringy chicken that is disappointing after reheating. But what if I told you there is a simple secret to ensure your chicken stays incredibly tender and moist, every single time?
Get ready to discover my ultimate recipe for Velvety Honey Garlic Chicken, one of the best Healthy Chicken Recipes you will ever make for meal prep. This dish is not only bursting with sweet and savory flavor, but it also features a game-changing technique that guarantees perfectly tender, succulent chicken. I will share all my insights on cooking techniques, meal prep tips, and how to achieve restaurant-quality results right in your kitchen.
Why You’ll Love This Recipe
My secret weapon for incredibly tender chicken is a simple, yet powerful technique called ‘Dry Velveting.’ Before cooking, you will toss the raw chicken pieces with just 1/4 teaspoon of baking soda and let them sit for 15 minutes. This small step is a game-changer for Meal Prep.
The scientific logic is fascinating: baking soda is an alkaline agent that gently raises the pH level on the chicken’s surface. This inhibits the proteins from bonding too tightly when heated, resulting in ‘velvety’ tender meat that locks in moisture and stays juicy, even after being reheated. Say goodbye to dry, stringy chicken forever!
Here are a few more reasons why this Honey Garlic Chicken recipe will become a staple in your kitchen:
- Unrivaled Tenderness: Thanks to the velveting technique, you will achieve perfectly juicy and tender chicken every single time, even when reheated, making it truly ideal for Meal Prep.
- Effortless & Fast: This is a quick, one-pan (or skillet) meal that is perfect for busy weeknights, ready in under 30 minutes.
- Healthy & Balanced: Featuring lean Chicken Breast, nutrient-rich Quinoa, and fresh broccoli, this dish is High Protein, naturally Gluten-Free, and provides excellent Macros and Dietary Fiber, fitting beautifully into a healthy lifestyle.
- Irresistible Flavor: The homemade Honey Garlic Sauce, with a hint of Sriracha, creates a perfect balance of sweet, savory, and a little kick that is utterly delicious.
Ingredients Needed

- 2 tablespoons avocado oil (divided, or any other oil)
- 4 chicken breasts (diced into 1-inch pieces)
- 1 large egg (beaten)
- 3 tablespoons cornstarch (or more if needed.)
- 1 1/4 teaspoon kosher salt (divided)
- 1 head broccoli (cut into small florets)
- 2 cups cooked quinoa
- 2 tablespoons honey
- 2 tablespoons sriracha sauce (use 1 tablespoon for a less spicy option)
- 2 garlic cloves (minced)
- 1 tablespoon rice vinegar
- 1 teaspoon sesame oil
- 2 green onions (thinly sliced)
- 1-2 teaspoon black and white sesame seeds (or as desire)
Ingredient Notes & Substitutions
Chicken Breast: Always start with high-quality Chicken Breast for the best results. The dry velveting technique also works wonderfully for other cuts of chicken, like thighs or even pork, if you wish to experiment.
Avocado Oil: I love using Avocado Oil for this recipe because of its high smoke point, which is great for high-heat cooking and achieving a beautiful sear. Grapeseed oil or even a light olive oil would also work well as alternatives.
Cornstarch: This is crucial for creating that beautiful, crispy exterior and helping to thicken our Honey Garlic Sauce. For 4 chicken breasts, 3 tablespoons of cornstarch create an ideal coating. Do not skimp on it!
Quinoa: Quinoa is a fantastic Whole Grain with numerous Whole Grain Quinoa Benefits, offering a complete protein and essential nutrients. If you prefer, brown rice, couscous, or even cauliflower rice make excellent swaps, especially for those looking for a lower-carb option.
Honey: Honey provides the perfect natural sweetness to balance the savory and spicy notes in our Honey Garlic Sauce. For a different flavor profile or to manage glycemic impact, agave can be used as a substitute.
Sriracha: This adds a lovely warmth and spice. Feel free to adjust the quantity to your preference; 1 tablespoon is great for a milder version. This recipe is naturally Gluten-Free, making it a great option for many dietary needs.
Sodium Reduction: For those watching their sodium intake, while this specific sauce is quite balanced, generally, when making homemade sauces, low-sodium tamari or coconut aminos can be excellent alternatives to soy sauce for reducing sodium content.
Broccoli: I prefer fresh broccoli florets for their crisp texture, but frozen broccoli can also be used in a pinch. Just ensure it is fully thawed and patted dry before stir-frying to prevent excess water from steaming the chicken.

How to Make Velvety Honey Garlic Chicken
Follow these step-by-step instructions to create tender, flavorful chicken that is perfect for Meal Prep.
1. Prepare Chicken & Velveting
First, dice your 4 chicken breasts into uniform 1-inch pieces. Place the diced chicken into a medium bowl. Here is the magic: sprinkle 1/4 teaspoon of baking soda over the chicken and toss gently to coat each piece evenly. Let this sit for 15 minutes. While the chicken is resting, prepare two separate shallow bowls: one with the 1 large egg, beaten, and the other with 3 tablespoons cornstarch mixed with a pinch of salt and pepper (about 1 teaspoon from your 1 1/4 teaspoon kosher salt total).
2. Coat Chicken
After the velveting time, dip each velveted chicken piece into the beaten egg, allowing any excess to drip off. Then, transfer the egg-coated chicken pieces into the cornstarch bowl. Toss thoroughly to ensure each piece is lightly and evenly coated in the cornstarch. This coating is key for a crispy exterior and helps the Honey Garlic Sauce adhere beautifully.
3. Cook Chicken to Golden Perfection
Heat one tablespoon of the 2 tablespoons avocado oil in a non-stick skillet over medium heat. Once the oil is shimmering, carefully add the coated chicken pieces to the skillet in a single layer, ensuring they do not overlap. This is crucial for achieving that beautiful Maillard Reaction and a golden-brown sear, rather than steaming the chicken. Cook the chicken until it is golden brown on all sides and cooked through, about 8-10 minutes. For food safety, ensure an internal temperature of 165°F. Remove the perfectly cooked, crispy chicken from the skillet and set aside.
4. Whisk Honey Garlic Sauce
While the chicken is resting, in a medium bowl, whisk together all the sauce ingredients: 2 tablespoons honey, 2 tablespoons sriracha sauce (adjust for less spice if desired), 2 minced garlic cloves, 1 tablespoon rice vinegar, and 1 teaspoon sesame oil. This aromatic blend creates our signature Honey Garlic Sauce.
5. Glaze Chicken
Pour the freshly whisked Honey Garlic Sauce over the cooked chicken pieces. Toss gently to coat every piece completely, allowing the sauce to thicken slightly and create a glistening glaze around the velvety chicken. The fragrant garlic and sweet honey will truly come alive.
6. Sauté Broccoli
Quickly wipe the pan clean with a paper towel to remove any burnt bits. Add the remaining one tablespoon of avocado oil to the skillet and preheat it again over medium-high heat. Add the 1 head broccoli florets and stir-fry them until they are tender-crisp and start to brown, which takes about 2-3 minutes. Season with a pinch of salt and pepper. This Stir-fry technique brings out the broccoli’s natural sweetness and maintains its vibrant color.
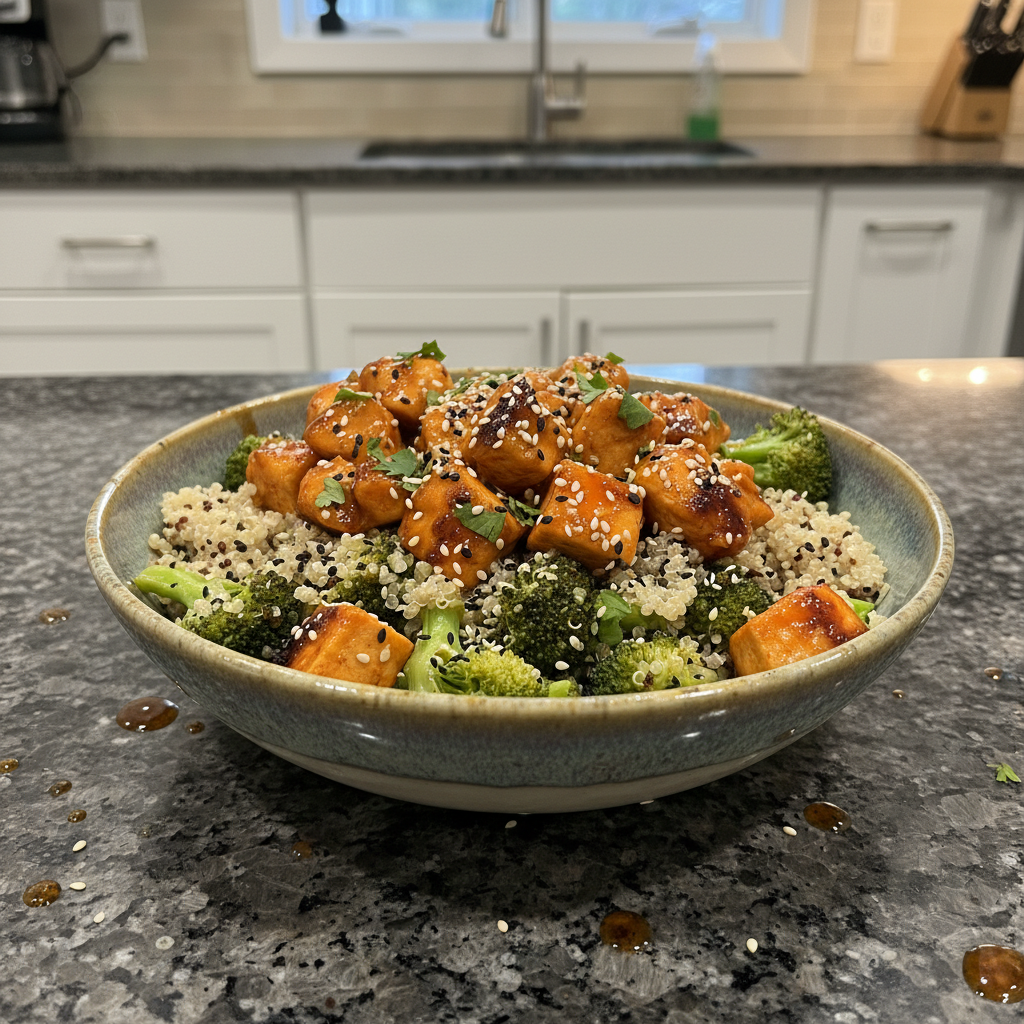
7. Assemble Meal Prep Bowls
Now it is time to assemble your delicious Meal Prep bowls. Divide about 1/2 cup of cooked quinoa (from your 2 cups cooked quinoa total) into each meal prep container. Then, arrange the sautéed broccoli and the glazed Honey Garlic Chicken equally among your bowls, layering them beautifully over the Quinoa.
8. Garnish & Serve
To finish, garnish each bowl with thinly sliced 2 green onions and a sprinkle of 1-2 teaspoon black and white sesame seeds. A fresh lime wedge on the side is perfect for a burst of citrus to cut through the richness. These bowls can be refrigerated for up to 4 days. Serve cold or reheated, as desired.
Meal Prep & Healthy Adjustments
Mastering Your Meal Prep: Storage & Reheating for Success
Food Safety and Fridge Life: These Velvety Honey Garlic Chicken Meal Prep bowls can be safely refrigerated for up to 4 days, making them perfect for your weekly planning. Always ensure the chicken is cooled completely before sealing and storing to prevent condensation.
Optimal Reheating Methods: The beauty of our dry velveting technique is how well it preserves moisture, even after reheating! For the best results, reheat your chicken in the microwave with a splash of water for 1-2 minutes, stirring halfway. This keeps the chicken juicy. Alternatively, you can reheat on the stovetop over low heat, adding a teaspoon of water or broth to create steam and prevent drying.
Storage Container Recommendations: To prevent the broccoli from getting soggy, use meal prep containers that have separate compartments, or store the broccoli in a small, breathable container next to the chicken and quinoa. For the Quinoa, ensure it is in an airtight container to keep it from getting hard.
Batch Cooking Efficiency: To streamline your Batch Cooking Efficiency, consider cooking a larger batch of Quinoa at the beginning of the week. You can also dice and velvet the chicken the day before to save time on cooking day.
Health & Dietary Adjustments
Sodium Reduction: While this recipe is well-balanced, if you are particularly sensitive to sodium, you can slightly reduce the kosher salt used in the chicken coating. For other recipes where you might use soy sauce, consider low-sodium tamari or coconut aminos as excellent, flavorful alternatives. Always check the labels on your Sriracha sauce as well.
Gluten-Free: Great news! This recipe is naturally Gluten-Free. It uses cornstarch for the coating instead of wheat flour, and Quinoa is a naturally gluten-free grain. Just double-check your Sriracha and any other bottled sauces to ensure they do not contain hidden gluten if you have a severe allergy.
Keto-Friendly Adaptations: To make this delicious meal keto-friendly, simply swap the Quinoa for cauliflower rice. For a stricter keto approach, you might also consider a sugar-free alternative to honey, adjusting your Macros accordingly to fit your carbohydrate goals. The lean Chicken Breast and fibrous broccoli are already excellent keto components.
Nutritional Focus: This recipe exemplifies Lean Protein Selection with the Chicken Breast, providing essential amino acids for muscle health. The Whole Grain Quinoa Benefits include sustained energy and a good source of Dietary Fiber, as does the broccoli, promoting digestive health and satiety.
Pro Tips & Troubleshooting
Pro Tips for Perfectly Velvety Chicken
- The Velveting Advantage: Do not skip the 1/4 teaspoon baking soda step! It is the secret to superior tenderness and juiciness that holds up beautifully, especially when reheating your Meal Prep chicken.
- Achieving the Golden Crust: Use a quality non-stick skillet and ensure sufficient Avocado Oil for the perfect Maillard Reaction. This creates that desirable golden-brown and slightly crispy exterior on your chicken.
- Single Layer Cooking: Always cook your chicken in a single layer. Overcrowding cools the pan and steams the chicken instead of searing it, preventing that delicious crust from forming.
- Clean Pan for Broccoli: After cooking the chicken, quickly wipe the pan clean. This prevents any burnt bits from sticking to and flavoring your fresh broccoli, ensuring clean, vibrant flavors.
- Sauce Consistency: If your Honey Garlic Sauce seems too thin, you can create a cornstarch slurry (1 teaspoon cornstarch mixed with 1 tablespoon cold water) and stir it into the simmering sauce before tossing with the chicken. This will help achieve a perfect, thick glaze.
- Pre-seasoning: Even though the sauce is flavorful, remember to season the chicken lightly with kosher salt and pepper before coating. This builds foundational flavor from the inside out.
Common Mistakes to Avoid
- Overcrowding the Pan: This is a common pitfall that lowers the pan temperature, prevents the Maillard Reaction, and ultimately results in steamed, grey, and rubbery chicken. Cook in batches if necessary.
- Insufficient Cornstarch: Using too little cornstarch (for example, only 2 tablespoons instead of 3 for 4 chicken breasts) can lead to a less crispy exterior and a thinner, less adherent sauce.
- Forgetting to Season: Not seasoning the chicken itself before the coating process can result in bland meat, even with a delicious sauce. Layering flavor is key!
- Overcooking Chicken: Even with the velveting technique, overcooking chicken will still make it tough. Cook just until the internal temperature reaches 165°F for optimal tenderness and juiciness.
- Soggy Broccoli: Avoid overcooking your broccoli. You want it tender-crisp, with a slight bite, not mushy. Watch it carefully during the stir-fry step.
Serving & Storage
Serving Suggestions to Elevate Your Dish
Classic Pairings: My absolute favorite way to serve this Velvety Honey Garlic Chicken is with fresh lime wedges. The bright citrus beautifully cuts through the sweetness of the Honey Garlic Sauce, adding a burst of freshness.
Textural Contrast: For an exciting textural contrast and a boost of probiotics, try serving a side of tangy kimchi. Its crunch and fermented flavor complement the dish wonderfully.
Fresh Finish: A scattering of thinly sliced radishes can add a delightful, peppery note and a pop of color to your meal prep bowls.
Dietary Enhancements: To boost your Dietary Fiber intake even further, consider pairing this dish with extra steamed greens like spinach or a light, crisp cucumber salad.
Beverage Pairings: A light, crisp white wine like a Sauvignon Blanc or a refreshing iced green tea would be lovely complements to this flavorful meal.
Make-Ahead & Storage Best Practices
Refrigeration: Your cooked Honey Garlic Chicken and meal prep components will stay fresh and delicious when refrigerated in airtight containers for up to 4 days. This makes it an ideal option for planned meals throughout your week.
Freezing (Optional for Meal Prep): While I prefer this dish fresh, for longer storage, you can freeze individual portions in freezer-safe containers for up to 2-3 months. Be aware that the broccoli might become a bit softer upon thawing, but the velveted chicken will maintain its tender texture quite well.
Preventing Dryness & Soggy Broccoli: The dry velveting technique is your best friend here, preventing your Meal Prep chicken from getting dry when reheating. For the broccoli, use containers that allow for some air circulation or keep it separate from the wetter components until serving to maintain its crispness.
Quinoa Storage: The best way to store cooked quinoa so it does not get hard is in an airtight container. If you are preparing meal prep bowls, layering it at the bottom helps protect it. A tiny splash of water during reheating can also revive its texture if it seems a bit firm.
Conclusion
There you have it: my ultimate Velvety Honey Garlic Chicken recipe, a true game-changer for Healthy Chicken Recipes and effortless meal prep. Thanks to our unique dry velveting technique, you can confidently prepare tender, juicy, and incredibly flavorful chicken that stands up beautifully to reheating.
I am confident that even if you are new to cooking, by following these detailed steps and expert tips, you will achieve restaurant-quality results every single time. Feel free to explore the suggested variations and serving ideas to make this dish your own.
Do not forget to save or print this recipe for your next cooking session, and share your delicious High Protein, Meal Prep creations with us! Happy cooking!
Frequently Asked Questions
- Q1: How do I prevent my meal prep chicken from getting dry when reheating?
A1: The key is our ‘dry velveting’ technique! Tossing the diced chicken with 1/4 teaspoon of baking soda before cooking helps lock in moisture. When reheating, especially in the microwave, add a tiny splash of water or broth and reheat on medium power. On the stovetop, use low heat with a lid to create steam.
- Q2: Is honey garlic chicken actually healthy for weight loss?
A2: Yes, this recipe can be very healthy for weight loss! It features lean Chicken Breast, providing High Protein and satiety, combined with Whole Grain Quinoa Benefits and plenty of Dietary Fiber from the broccoli. Focus on portion control and be mindful of the amount of honey used for balanced Macros.
- Q3: Can I make this recipe in an air fryer to save oil?
A3: Absolutely! You can adapt the chicken cooking for an air fryer. After coating, arrange the chicken in a single layer in your air fryer basket, ensuring it is not overcrowded. Cook at 375°F (190°C) for 10-15 minutes, flipping halfway, until golden and cooked through (165°F internal temperature). This is a great way to reduce the need for Avocado Oil while still achieving a crispy exterior.
- Q4: What is the best way to store the quinoa so it does not get hard?
A4: Store cooked quinoa in an airtight container. If you are assembling meal prep bowls, layering it at the bottom of the container can help. If it becomes a little firm upon reheating, a tiny splash of water or broth stirred in will help soften it.
- Q5: How can I make this recipe keto-friendly?
A5: To make this recipe keto-friendly, simply substitute the Quinoa with cauliflower rice. For the Honey Garlic Sauce, you could use a sugar-free honey alternative if you are strict keto, and adjust your overall Macros accordingly. The Chicken Breast and broccoli are already excellent keto staples.
- Q6: How do you thicken honey garlic sauce?
A6: If your Honey Garlic Sauce seems too thin, you can easily thicken it with a cornstarch slurry. Mix 2 teaspoons of cornstarch with 1 tablespoon of cold water until smooth. Stir this mixture into the simmering sauce (before adding to the chicken) and cook for another minute until it reaches your desired consistency.
- Q7: Is this recipe gluten-free?
A7: Yes, this Velvety Honey Garlic Chicken recipe is naturally Gluten-Free! We use cornstarch for the chicken coating, which is a gluten-free alternative to flour, and Quinoa is a naturally gluten-free grain. Always check ingredient labels on any sauces if you have severe gluten sensitivities.
Velvety Honey Garlic Chicken: The Ultimate Healthy Meal Prep Recipe
Ingredients
Equipment
Method
- First, dice your 4 chicken breasts into uniform 1-inch pieces. Place the diced chicken into a medium bowl. Sprinkle 1/4 teaspoon of baking soda over the chicken and toss gently to coat each piece evenly. Let this sit for 15 minutes. While the chicken is resting, prepare two separate shallow bowls: one with the 1 large egg, beaten, and the other with 3 tablespoons cornstarch mixed with a pinch of salt and pepper (about 1 teaspoon from your 1 1/4 teaspoon kosher salt total).
- After the velveting time, dip each velveted chicken piece into the beaten egg, allowing any excess to drip off. Then, transfer the egg-coated chicken pieces into the cornstarch bowl. Toss thoroughly to ensure each piece is lightly and evenly coated in the cornstarch. This coating is key for a crispy exterior and helps the Honey Garlic Sauce adhere beautifully.
- Heat one tablespoon of the 2 tablespoons avocado oil in a non-stick skillet over medium heat. Once the oil is shimmering, carefully add the coated chicken pieces to the skillet in a single layer, ensuring they do not overlap. Cook the chicken until it is golden brown on all sides and cooked through, about 8-10 minutes. For food safety, ensure an internal temperature of 165°F. Remove the perfectly cooked, crispy chicken from the skillet and set aside.
- While the chicken is resting, in a medium bowl, whisk together all the sauce ingredients: 2 tablespoons honey, 2 tablespoons sriracha sauce (adjust for less spice if desired), 2 minced garlic cloves, 1 tablespoon rice vinegar, and 1 teaspoon sesame oil. This aromatic blend creates our signature Honey Garlic Sauce.
- Pour the freshly whisked Honey Garlic Sauce over the cooked chicken pieces. Toss gently to coat every piece completely, allowing the sauce to thicken slightly and create a glistening glaze around the velvety chicken. The fragrant garlic and sweet honey will truly come alive.
- Quickly wipe the pan clean with a paper towel to remove any burnt bits. Add the remaining one tablespoon of avocado oil to the skillet and preheat it again over medium-high heat. Add the 1 head broccoli florets and stir-fry them until they are tender-crisp and start to brown, which takes about 2-3 minutes. Season with a pinch of salt and pepper. This Stir-fry technique brings out the broccoli's natural sweetness and maintains its vibrant color.
- Now it is time to assemble your delicious Meal Prep bowls. Divide about 1/2 cup of cooked quinoa (from your 2 cups cooked quinoa total) into each meal prep container. Then, arrange the sautéed broccoli and the glazed Honey Garlic Chicken equally among your bowls, layering them beautifully over the Quinoa.
- To finish, garnish each bowl with thinly sliced 2 green onions and a sprinkle of 1-2 teaspoon black and white sesame seeds. A fresh lime wedge on the side is perfect for a burst of citrus to cut through the richness. These bowls can be refrigerated for up to 4 days. Serve cold or reheated, as desired.