There are few things as delightfully refreshing and elegantly simple as a perfectly executed lemon posset. As a professional chef, I’ve always admired its understated sophistication, yet I know many home cooks approach this seemingly straightforward creamy lemon dessert with a touch of trepidation, fearing the dreaded curdled mixture. Today, I’m thrilled to share my absolute best recipe, a foolproof method that guarantees a luxuriously smooth, silky texture every single time. Get ready to discover the secret to a no-curdle lemon posset, a simple temperature trick that will transform your kitchen into a haven of culinary success.
Why You’ll Love This Recipe
My kitchen thrives on delicious simplicity, and this creamy lemon dessert is a shining example. What makes my version truly special and a guaranteed success? It all comes down to a crucial detail that eliminates the most common pitfall of posset making: curdling. I’ve discovered a specific temperature sweet spot that ensures perfect results.
The 185°F No-Curdle Secret: The absolute game-changer in this recipe is cooling your heavy whipping cream mixture to precisely 185°F (85°C) before slowly whisking in the lemon juice. This tempering step is scientifically proven to prevent the curdling that often happens when hot dairy meets acid. The result? A perfectly smooth, gorgeously set posset with zero fuss.
Silken Texture with Superfine Sugar: Beyond temperature, I recommend using superfine sugar, or ensuring your granulated sugar dissolves completely. This minor adjustment ensures a quicker dissolution in the cream, leading to a truly silken mouthfeel without any trace of graininess.
Effortlessly Elegant & Make-Ahead Marvel: You’ll love that this lemon posset is surprisingly easy to make with minimal ingredients, yet it presents as an incredibly elegant dessert, perfect for entertaining. It’s also an ideal make-ahead dessert, requiring significant chilling time, which frees you up to enjoy your guests or simply relax before serving.
Ingredients Needed

- 1 cup heavy whipping cream
- 1/3 cup granulated sugar
- 1-2 small to medium lemons (zested and juiced (about 1-2 tbsp zest and 2-3 tbsp juice))
Ingredient Notes & Substitutions
Heavy Whipping Cream: This is truly the star of our creamy dessert, and it’s non-negotiable. Unfortunately, you cannot substitute anything else for the heavy whipping cream. Its high fat content (typically 36% or more) is absolutely crucial for the posset to set correctly and achieve that signature smooth, creamy texture through acid coagulation.
Granulated Sugar (or Superfine Sugar): While standard granulated sugar works beautifully, if you can get your hands on superfine sugar (also known as caster sugar), I highly recommend it. Its finer crystals dissolve much more quickly, contributing to an even smoother texture. If using regular granulated sugar, just ensure it dissolves completely during the simmering phase to prevent any graininess in your finished creamy lemon dessert.
Lemons (Zest & Juice): Fresh lemons are key for that vibrant flavor! When zesting, use a microplane or a fine grater, being careful to only get the bright yellow outer layer, avoiding the bitter white pith underneath. For maximum lemon juice yield, roll the lemons firmly on your counter before cutting and juicing. You’ll be surprised how much more juice you get!

How to Make Your Silky Lemon Posset
Creating this elegant creamy lemon dessert is a delightful process, and with my specific technique, you’ll achieve perfection every time. Here’s how we do it:
Step 1: Prepare Your Lemons
First, grab your lemons. Using a microplane, carefully zest your lemons, making sure to avoid the bitter white pith. You want only the fragrant yellow lemon zest. Then, cut your lemons in half and squeeze out the juice. Set both the zest and juice aside, ready for action.
Step 2: Simmer the Cream Mixture
In a heavy-bottomed saucepan, combine your heavy whipping cream, granulated sugar (or superfine sugar), and the lemon zest you just prepared. Place the saucepan over medium heat and stir gently until the sugar completely dissolves. Increase the heat slightly to medium-high until the mixture just starts to boil. Once it reaches a gentle boil, immediately reduce the heat to medium/medium low and let it simmer for 5-8 minutes. Keep a close eye on it to ensure the cream doesn’t boil over. You’ll notice the cream start to slightly reduce in volume and take on a delicate golden yellow color as it thickens slightly.
Step 3: The Critical Tempering Step (Our No-Curdle Secret!)
This is where the magic happens! Once your cream has reduced and taken on that lovely hue, remove the saucepan from the heat. Now, and this is crucial, allow the mixture to cool. You’re aiming for a temperature of 185°F (85°C). Use a food thermometer for precision – it’s your best friend here. Once it hits the target temperature, slowly, I mean slowly, begin to whisk in the reserved lemon juice. Adding the acid at this specific, slightly lower temperature ensures a gradual and controlled coagulation of the milk proteins, preventing any dreaded curdling and guaranteeing a perfectly smooth, creamy set.
Step 4: Strain for Perfection (Optional but Recommended)
For an incredibly silky smooth texture, I highly recommend an optional step: strain the warm posset mixture through a fine mesh strainer. This removes the lemon zest particles and any tiny protein clumps, ensuring a truly refined finish. If you love the visual and aromatic appeal of the zest, you can skip this, but for ultimate smoothness, it’s worth the extra minute.
Step 5: Chill to Set
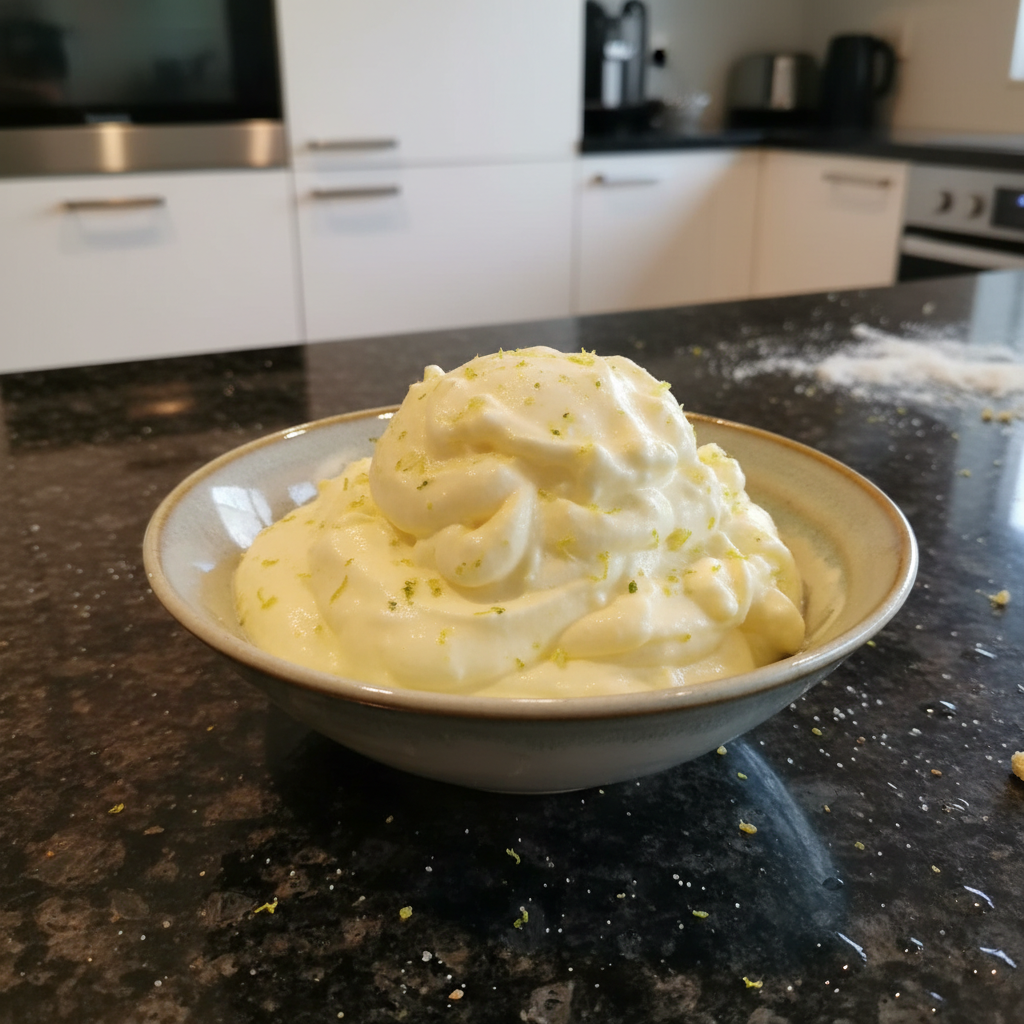
Carefully pour your perfectly smooth posset mixture into your chosen serving containers or ramekins. Place them in the refrigerator and let them chill for at least 4 hours, though overnight is truly ideal for the best custard-like consistency. If you’re feeling fancy, you can even pour them into hollowed-out lemon halves for a whimsical presentation.
Step 6: Garnish & Serve
Once beautifully set and chilled, your creamy lemon dessert is ready to shine! Serve it plain, or elevate it with a garnish of fresh berries (raspberries or strawberries are particularly lovely) or a delicate drizzle of coulis. For a show-stopping twist, sprinkle 1-2 teaspoons of granulated sugar evenly over the top of the chilled posset and use a kitchen torch to brûlée the sugar until golden and caramelized, transforming it into a stunning Crème Brûlée posset!
The Science Behind Your Silky Lemon Posset: No Curdles, Just Creamy Perfection
As a chef, I love understanding the “why” behind every perfect dish. Lemon posset, seemingly simple, is a marvel of food science. Let’s demystify how we achieve that impeccable smooth, creamy set without a hint of curdling.
Understanding Posset’s Unique Set
Unlike a traditional custard that relies on eggs, or a panna cotta that uses gelatin, lemon posset is a unique no-bake dessert that sets through the clever process of acid coagulation. When lemon juice (an acid) is introduced to heavy whipping cream (dairy), the acid causes the milk proteins, specifically casein, to slowly denature and link together, forming a delicate network that traps the liquid and creates that signature thick, creamy consistency.
The 185°F (85°C) Sweet Spot to Prevent Curdling
The biggest challenge with lemon posset is avoiding curdling. This typically happens when lemon juice is added to dairy that is too hot or too quickly. The high heat causes the milk proteins to unravel too rapidly, clumping together in an unsightly, grainy mess. Our unique twist addresses this head-on: by cooling the cream mixture to a precise 185°F (85°C) before slowly whisking in the lemon juice, we achieve a stable emulsion. This allows for a much more gradual, controlled protein coagulation. Think of it as a gentle hand guiding the proteins into a perfectly organized structure, resulting in a perfectly smooth, creamy, and utterly delightful set.
Visual Cues for Proper Cream Reduction
One common question I get is how to know when the cream has reduced sufficiently. Beyond the slightly golden yellow color mentioned in the recipe, look for the “nappe stage.” This is a classic chef’s trick: dip a spoon into the simmering cream, then pull it out. Draw a line across the back of the spoon with your finger. If the line holds and doesn’t run, your cream has thickened perfectly! You’ll also notice a slight volume reduction, typically by about 1/4 to 1/3, indicating that some of the water has evaporated and the cream has concentrated its richness.
Pro Tips & Troubleshooting
Achieving the perfect creamy lemon dessert is easy with these insider tips and a bit of knowledge about what to avoid.
Pro Tips for the Perfect Posset
- Temperature is Key: Always, always use a food thermometer to ensure your cream mixture cools to 185°F (85°C) before you even think about adding the lemon juice. This tempering step is the cornerstone of a no-curdle posset.
- Achieve Proper Cream Reduction: Don’t rush the simmer. Cook the cream long enough (5-8 minutes) until it slightly reduces in volume and takes on a delicate golden yellow color. This ensures it will set beautifully.
- Don’t Rush the Chill: Patience is a virtue, especially with lemon posset! Allow at least 4 hours, but ideally overnight, in the refrigerator for the best firm, yet creamy consistency.
- Strain for Ultimate Smoothness: For that truly luxurious, silky smooth texture, take the extra minute to strain the warm posset mixture through a fine mesh strainer. It removes any stray lemon zest or tiny protein clumps.
- Optimize Lemon Flavor: When zesting lemons, avoid the bitter white pith. For maximum juice, roll lemons on the counter before cutting and juicing.
- Use Superfine Sugar: If possible, opt for superfine sugar. It dissolves more quickly and contributes to a more smoother texture, enhancing the overall elegance of your creamy lemon dessert.
Common Mistakes to Avoid
- Substituting Heavy Cream: Resist the urge! Heavy whipping cream is irreplaceable. Lower fat dairy like milk or half-and-half lacks the fat content necessary for the posset to properly set.
- Curdling: The most common misstep! Curdling happens when lemon juice is added to cream that is too hot. Remember our secret: cool the cream mixture to 185°F (85°C) before slowly whisking in the acid.
- Cream Boiling Over: Keep a close eye on your saucepan during the initial boil and subsequent simmer. Once it reaches a boil, immediately reduce the heat to prevent the heavy whipping cream from bubbling over.
- Runny Posset: If your posset doesn’t set, it’s usually because the cream wasn’t reduced enough during the simmering phase. Ensure you’ve seen those visual cues like the nappe stage or slight volume reduction.
- Grainy Texture: This is almost always due to undissolved granulated sugar. Stir well during the initial heating to ensure all the sugar crystals have completely melted into the cream.
Serving & Storage
Part of the joy of a creamy lemon dessert like posset is how beautifully it can be presented and how convenient it is to store!
Serving Ideas
- Elegant Presentations: My favorite way to serve lemon posset is in individual ramekins or small, clear glass jars (like Oui yogurt jars). For an extra touch of whimsy and natural charm, consider presenting them in hollowed-out lemon halves, ensuring they sit stable by trimming a thin slice off the bottom.
- Garnishes & Pairings: Classic garnishes include fresh berries such as vibrant raspberries or sliced strawberries, which offer a beautiful color contrast and a hint of tartness. A drizzle of raspberry or strawberry coulis is also exquisite. A dollop of lightly stabilized whipped cream or crisp shortbread cookies served alongside provide lovely textural variations.
- The Crème Brûlée Posset Twist: For a truly decadent experience, embrace the Crème Brûlée twist! Once your posset is fully chilled, sprinkle 1-2 teaspoons of granulated sugar evenly over the top of each serving. Use a kitchen torch to melt and caramelize the sugar until it forms a gorgeous, crunchy amber crust.
- Citrus Variations: Don’t limit yourself to lemons! Experiment with other citrus fruits like bright limes for a Key lime posset, or juicy oranges for a sweeter, more aromatic version.
- Tart or Tartlet Filling: The set posset makes a wonderful tartlet filling. Simply bake your tart shells, then fill them with the chilled posset for a unique and impressive dessert.
Storage and Make-Ahead
- Refrigeration: Lemon posset is a dream for planning ahead! It should be stored, covered, in the refrigerator for up to 3-5 days. In fact, it’s an excellent make-ahead dessert because it requires significant chilling time to set properly.
- Freezing: While lemon posset *can* technically be frozen, I generally advise against it if you’re prioritizing that perfectly smooth, creamy texture. Upon thawing, the texture may become slightly less velvety or creamy due to some milk fat separation. For the absolute best experience, I recommend enjoying it fresh from the refrigerator.
- Ideal for Entertaining: Its requirement to be made hours or even a day in advance makes posset a fantastic choice for entertaining, allowing you to focus on your guests and other dishes on the day of your event.
Conclusion
There you have it—my secret to the most perfectly smooth, silky, and utterly irresistible creamy lemon dessert. By understanding and embracing the simple yet critical 185°F (85°C) cooling trick, you can banish the fear of curdling and confidently create a lemon posset that rivals any restaurant’s. This recipe truly is a testament to how small, precise steps can lead to magnificent results.
I encourage you to try this recipe, experiment with the suggested serving ideas or variations, and truly savor the bright, luxurious flavors. You’ll soon discover that even beginners can achieve a no-curdle lemon posset that will impress everyone. Happy cooking, and I can’t wait to hear about your delicious creations! Feel free to leave a comment below or explore more citrus desserts on my blog.
FAQ
What is a lemon posset and how does it thicken naturally?
A lemon posset is a classic English creamy dessert, simple in its ingredients yet elegant in its presentation. It thickens naturally through a process called acid coagulation. When lemon juice (an acid) is added to heated heavy whipping cream, the acid causes the milk proteins (casein) to unravel and link together, creating a thick, custard-like consistency without the need for eggs or gelatin.
What is the ideal temperature and technique to prevent lemon posset from curdling?
To prevent curdling, the ideal temperature for adding lemon juice to the cream mixture is 185°F (85°C). After simmering, remove the cream from the heat and let it cool to this specific temperature. Then, slowly whisk in the lemon juice. This controlled tempering allows for gradual protein coagulation, resulting in a perfectly smooth, creamy set.
Can I substitute heavy cream in a lemon posset recipe?
No, heavy whipping cream is essential and cannot be substituted in a lemon posset recipe. Its high milk fat content (36% or higher) is crucial for the acid coagulation process that thickens the posset and gives it its unique creamy set and smooth texture.
How long does lemon posset need to chill and can it be made in advance?
Lemon posset needs to chill in the refrigerator for at least 4 hours to set properly, but for the best firm, yet creamy consistency, I recommend chilling it overnight. It is an excellent make-ahead dessert, perfect for preparing a day or two in advance of serving.
What are the best serving suggestions and garnishes for lemon posset?
For elegant serving ideas, present posset in individual ramekins, small glass jars, or even hollowed-out lemon halves. Garnish with fresh berries (like raspberries or strawberries), a drizzle of fruit coulis, or crisp shortbread cookies. For a special treat, sprinkle with granulated sugar and brûlée with a kitchen torch for a Crème Brûlée posset.
How can I adjust the sweetness or tartness of my lemon posset?
You can adjust the tartness/sweetness ratios slightly. If you prefer it sweeter, you can add a touch more granulated sugar to the cream mixture during the simmering stage (ensuring it fully dissolves). For more tartness, a tiny bit more lemon juice can be carefully stirred in at the 185°F (85°C) stage, *before* chilling. Always make small additions and taste as you go.
Why did my lemon posset curdle?
Curdling in lemon posset is almost always caused by adding the lemon juice to the heavy whipping cream mixture when it is too hot. The key is to allow the cream mixture to cool to 185°F (85°C) before slowly whisking in the acid, which prevents the milk proteins from denaturing too rapidly and clumping.
What is the difference between posset, pudding, and panna cotta?
These creamy desserts have distinct thickening mechanisms: Posset thickens via the acid coagulation of heavy whipping cream. Pudding typically uses starches (like cornstarch or flour) or eggs as thickeners. Panna cotta, an Italian dessert, relies on gelatin for its delicate, jiggly set.
Silky Creamy Lemon Posset: No-Curdle Recipe (185°F Secret!)
Ingredients
Equipment
Method
- First, grab your lemons. Using a microplane, carefully zest your lemons, making sure to avoid the bitter white pith. You want only the fragrant yellow lemon zest. Then, cut your lemons in half and squeeze out the juice. Set both the zest and juice aside, ready for action.
- In a heavy-bottomed saucepan, combine your heavy whipping cream, granulated sugar, and the lemon zest you just prepared. Place the saucepan over medium heat and stir gently until the sugar completely dissolves. Increase the heat slightly to medium-high until the mixture just starts to boil. Once it reaches a gentle boil, immediately reduce the heat to medium/medium low and let it simmer for 5-8 minutes. Keep a close eye on it to ensure the cream doesn’t boil over. You'll notice the cream start to slightly reduce in volume and take on a delicate golden yellow color as it thickens slightly.
- This is where the magic happens! Once your cream has reduced and taken on that lovely hue, remove the saucepan from the heat. Now, and this is crucial, allow the mixture to cool. You’re aiming for a temperature of 185°F (85°C). Use a food thermometer for precision – it’s your best friend here. Once it hits the target temperature, slowly, I mean slowly, begin to whisk in the reserved lemon juice. Adding the acid at this specific, slightly lower temperature ensures a gradual and controlled coagulation of the milk proteins, preventing any dreaded curdling and guaranteeing a perfectly smooth, creamy set.
- For an incredibly silky smooth texture, I highly recommend an optional step: strain the warm posset mixture through a fine mesh strainer. This removes the lemon zest particles and any tiny protein clumps, ensuring a truly refined finish. If you love the visual and aromatic appeal of the zest, you can skip this, but for ultimate smoothness, it’s worth the extra minute.
- Carefully pour your perfectly smooth posset mixture into your chosen serving containers or ramekins. Place them in the refrigerator and let them chill for at least 4 hours, though overnight is truly ideal for the best custard-like consistency. If you're feeling fancy, you can even pour them into hollowed-out lemon halves for a whimsical presentation.
- Once beautifully set and chilled, your creamy lemon dessert is ready to shine! Serve it plain, or elevate it with a garnish of fresh berries (raspberries or strawberries are particularly lovely) or a delicate drizzle of coulis. For a show-stopping twist, sprinkle 1-2 teaspoons of granulated sugar evenly over the top of the chilled posset and use a kitchen torch to brûlée the sugar until golden and caramelized, transforming it into a stunning Crème Brûlée posset!