There is nothing quite like the sound of perfectly crispy chicken skin shattering to reveal incredibly juicy meat, all coated in a rich, sticky, sweet-savory glaze. This recipe for Honey Garlic Chicken Thighs is truly a weeknight hero in my kitchen. It tastes like something you would order at a fantastic restaurant, but with minimal effort, you can create this high-reward meal at home. We will achieve the best possible texture using a smart sear-then-roast technique, all in a single oven-proof skillet.
Why You’ll Love This Recipe
I am always looking for ways to elevate classic dishes. This recipe offers a unique twist that truly sets it apart.
Optional Gourmet Upgrade: The Chef’s Secret Twist
You can infuse the honey with 1 tablespoon of freshly grated ginger and finish the sauce with a cold butter mount, also known as monter au beurre. The ginger provides a sharp, aromatic counterpoint to the sweetness of the honey. Whisking in cold butter at the reduction stage creates a stable emulsion, resulting in a velvety, restaurant-quality sauce that clings beautifully to every piece of chicken. This balance of acid and fat truly transforms the dish.
Unbeatable Texture Contrast
Say goodbye to soggy chicken skin. My method involves searing the skin aggressively first, which kickstarts the Maillard reaction. This process develops that deep golden-brown color and creates an incredibly crispy texture before the glaze is even introduced.
Practical Benefits for Busy Cooks
This dish is one-pan magic, meaning less cleanup for you. By using a single oven-proof skillet, you move directly from stovetop to oven with ease. Chicken thighs are also a budget-friendly choice. They are more flavorful and forgiving than chicken breasts, making them perfect for tender, juicy results every time. Plus, this recipe is universally loved. The honey sweetness appeals to kids, while the garlic and soy depth satisfies adult palates.
Ingredients Needed

Here is exactly what you will need to create this delicious meal in your kitchen.
1/3 c. honey
2 tbsp. low-sodium soy sauce
2 tbsp. apple cider vinegar
1/2 tsp. crushed red pepper flakes (optional)
6 bone-in, skin-on chicken thighs (about 2 1/2 pounds)
1 tsp. kosher salt
1/2 tsp. black pepper
1/2 c. all-purpose flour
3 tbsp. olive oil
6 garlic cloves, minced
Cilantro, for serving
Steamed white rice, for serving
Ingredient Notes & Substitutions
**Chicken:** Using bone-in, skin-on chicken thighs is crucial for this recipe. The bone helps keep the meat juicy during roasting, and the skin provides incredible flavor and texture. The skin rendering process creates that irresistible crispy exterior and helps protect the meat from drying out.
**Honey:** I recommend using a mild honey like clover or wildflower honey. If you can find local honey, it often has even better floral notes that will enhance the glaze.
**Soy Sauce:** Low-sodium soy sauce is important here. As the sauce reduces, its flavors will concentrate. Using low-sodium allows you to control the overall saltiness of the finished dish.
**Flour:** All-purpose flour is used for dredging. If you need a gluten-free alternative, cornstarch works wonderfully to create a similar light coating.

How to Make Honey Garlic Chicken Thighs
Follow these simple steps for perfectly cooked, flavorful Honey Garlic Chicken Thighs.
Step 1: Prep & Sauce
Preheat the oven to 400°F. In a small bowl, whisk together the honey, soy sauce, apple cider vinegar, and red pepper flakes, if using. The sauce will be a vibrant, glossy mixture. Set this aside.
Step 2: Dredge
Season the chicken with the salt and pepper. Place the flour in a shallow dish. Dredge both sides of the thighs in the flour, shaking off any excess. This light coating helps create that beautiful crispy skin and forms the base for our sauce. Shaking off the excess flour is important to prevent a gummy texture.
Step 3: Sear
Heat the olive oil in an oven-proof skillet over medium heat. A Cast iron skillet or stainless steel pan works best for this. Add the chicken, skin-side down, and cook until it is beautifully golden, about 4 to 6 minutes. You are looking for a deep golden-brown skin that releases easily from the pan when it is ready to flip.
Step 4: Aromatics & Roast
Flip the chicken, then add the minced garlic to the pan around the chicken. Let it cook until it becomes wonderfully fragrant, which takes about 1 minute. Pour the honey mixture over the top and around the chicken. Transfer the skillet to the oven. Roast until the chicken is cooked through and registers 165°F on an Instant-read thermometer inserted into the thickest part of a thigh, about 15 minutes. This Internal temperature ensures the chicken is safe to eat and perfectly juicy.
Step 5: Reduce & Serve
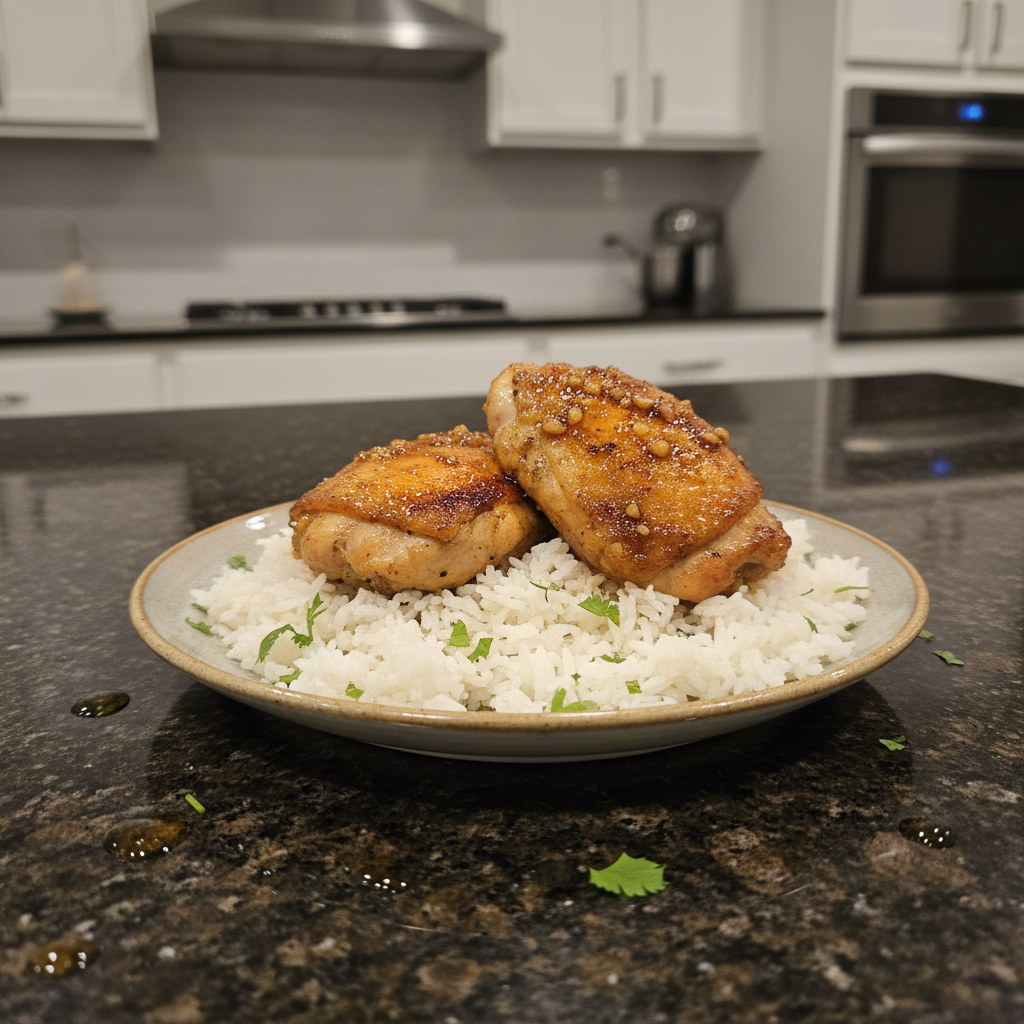
Transfer the chicken to a platter to rest. Bring the sauce remaining in the skillet to a simmer over medium heat and cook until it is reduced and thickened, about 2 to 3 minutes. The sauce should achieve a nappe consistency, meaning it will coat the back of a spoon. Spoon this luscious sauce over the chicken and sprinkle with fresh cilantro. Serve immediately with steamed white rice.
Troubleshooting: Crispy Skin & Perfect Sauce
Even experienced cooks sometimes encounter challenges. Here are some solutions for common issues.
Sauce Won’t Thicken?
If your Reduction sauce is too runny, simply simmer it for a little longer over medium heat. The goal is to evaporate more water, which will concentrate and thicken the sauce naturally. If the sauce looks like it is breaking or separating, whisk it vigorously. This can help re-Emulsification the sauce and bring it back together.
Soggy Skin?
The key to crispy skin is to sear it skin-side down first, as instructed. Ensure your oil is hot enough before adding the chicken. After the chicken roasts, if you want to maintain maximum crispness, try to spoon the sauce around the chicken rather than directly onto the skin. The oven finish usually helps to re-crisp it significantly.
Skillet Selection
For the best results, use a Cast iron skillet or a high-quality stainless steel skillet that is oven-safe. These materials offer excellent heat distribution and retention, which are essential for achieving that perfect sear. Avoid non-stick pans if high-heat searing is required, as they may not be suitable for the oven temperatures needed here.
Pro Tips & Common Mistakes
I have learned a few tricks over the years that will help you master this dish.
Chef’s Tips for Success
**Temperature is Key:** Always use an Instant-read thermometer to check the Internal temperature of your chicken. Pull the chicken from the oven as soon as it reaches 165°F. This precise timing helps to preserve the Amino acids and moisture, ensuring juicy, tender meat.
**Room Temp Chicken:** Let your chicken thighs sit out for about 15 minutes before cooking. Bringing them closer to room temperature promotes more even cooking throughout the thigh.
**Resting is Non-Negotiable:** After removing the chicken from the oven, allow it to rest on a platter for a few minutes. This crucial step allows the juices to redistribute back into the meat, ensuring every bite is succulent.
Mistakes to Avoid
**Burning the Garlic:** Garlic can burn quickly and become bitter. Be sure to follow the instruction to add the garlic only after you have flipped the chicken and the high-heat searing phase for the skin is complete. This short cooking time is all it needs to become fragrant.
**Crowding the Pan:** Do not overcrowd your skillet. If you add too many chicken thighs at once, they will steam instead of sear, preventing that desirable crispy skin. Cook in batches if necessary, or use a larger skillet.
**Using Breasts Instead of Thighs:** While you can technically swap in chicken breasts, be aware that they cook much faster and tend to dry out more easily. If you must use them, significantly adjust your cooking time and monitor the Internal temperature closely to avoid overcooking.
Serving & Storage Guide
Here are my recommendations for serving and keeping your Honey Garlic Chicken Thighs fresh.
Serving Ideas
Steamed white rice is a mandatory pairing for this dish; it is perfect for soaking up all that incredible sticky glaze. For a balanced meal, I love serving this with roasted broccoli, garlicky green beans, or a crisp cucumber salad to cut through the richness of the chicken. Consider serving alongside some crispy air fryer zucchini fries for a delicious and easy side dish. A sprinkle of toasted sesame seeds or thinly sliced green onions alongside the cilantro also adds a lovely finishing touch.
Storage & Reheating
**Fridge:** Store any leftover Honey Garlic Chicken Thighs in an airtight container in the refrigerator for up to 3-4 days.
**Reheating:** To maintain that delicious crispy skin, do NOT microwave your chicken. Instead, reheat it in a 350°F oven or an air fryer for about 5-7 minutes, or until warmed through and the skin has crisped up again.
**Freezing:** Cooked chicken thighs freeze well. Place them in a freezer-safe bag or container for up to 2-3 months. Be aware that the honey glaze may separate slightly upon thawing, but a quick whisk during reheating can help bring it back together. Thaw overnight in the fridge before reheating.
Conclusion
This recipe for Honey Garlic Chicken Thighs is truly a triumph of flavor and simplicity. The sear-then-roast technique ensures that every piece of chicken is incredibly juicy with beautifully crispy skin, all coated in a rich, sticky glaze. I encourage you to try the optional ginger and cold butter “twist” next time for an extra touch of gourmet magic. You will be amazed at the restaurant-quality results you can achieve right in your own kitchen. Pin this recipe for your next weeknight dinner!
Frequently Asked Questions (FAQ)
**Can I use boneless skinless chicken thighs?**
Yes, you can use boneless skinless chicken thighs. However, you will need to reduce the searing time to about 3-4 minutes per side. Also, start checking the chicken’s Internal temperature after about 10 minutes in the oven, as they will cook faster.
**What kind of skillet is best for this recipe?**
A Cast iron skillet or any oven-safe stainless steel skillet is best for this recipe. Avoid pans with plastic or non-heat-safe handles that cannot go into the oven.
**How do I know when the chicken is fully cooked?**
The chicken is fully cooked when its Internal temperature reaches 165°F. Always use an Instant-read thermometer inserted into the thickest part of the thigh, avoiding the bone, to ensure accuracy.
**Can I prep the honey garlic sauce ahead of time?**
Yes, you can absolutely prep the honey garlic sauce ahead of time. Whisk together all the sauce ingredients and store them in an airtight container in the fridge for up to 3 days.
**How do I make the chicken skin extra crispy?**
To achieve extra crispy chicken skin, make sure to thoroughly pat the chicken dry with paper towels before seasoning and dredging. Also, ensure the olive oil is hot enough in the skillet before adding the chicken, and do not overcrowd the pan.
Honey Garlic Chicken Thighs: Crispy Skin & Sticky Glaze
Ingredients
Equipment
Method
- Preheat the oven to 400°F (200°C). In a small bowl, whisk together the honey, soy sauce, apple cider vinegar, and red pepper flakes (if using). Set this vibrant, glossy sauce mixture aside.
- Season the chicken thighs generously with salt and pepper. Place the all-purpose flour in a shallow dish. Dredge both sides of each chicken thigh in the flour, shaking off any excess to ensure a light coating. This step is crucial for crispy skin and a good sauce base.
- Heat the olive oil in a large oven-proof skillet (such as cast iron or stainless steel) over medium heat. Add the chicken thighs, skin-side down, and sear for 4 to 6 minutes, until the skin is beautifully golden-brown and crispy, and easily releases from the pan.
- Flip the chicken thighs. Add the minced garlic to the pan around the chicken and cook for about 1 minute until fragrant. Pour the prepared honey sauce mixture over and around the chicken. Transfer the skillet to the preheated oven and roast for about 15 minutes, or until an instant-read thermometer inserted into the thickest part of a thigh (avoiding the bone) registers 165°F (74°C).
- Remove the skillet from the oven and transfer the cooked chicken thighs to a platter to rest. Place the skillet with the remaining sauce back on the stovetop over medium heat. Bring the sauce to a simmer and cook for 2 to 3 minutes, stirring occasionally, until it has reduced and thickened to a luscious, nappe consistency (coats the back of a spoon). Spoon the sticky glaze over the resting chicken, garnish with fresh cilantro, and serve immediately with steamed white rice.