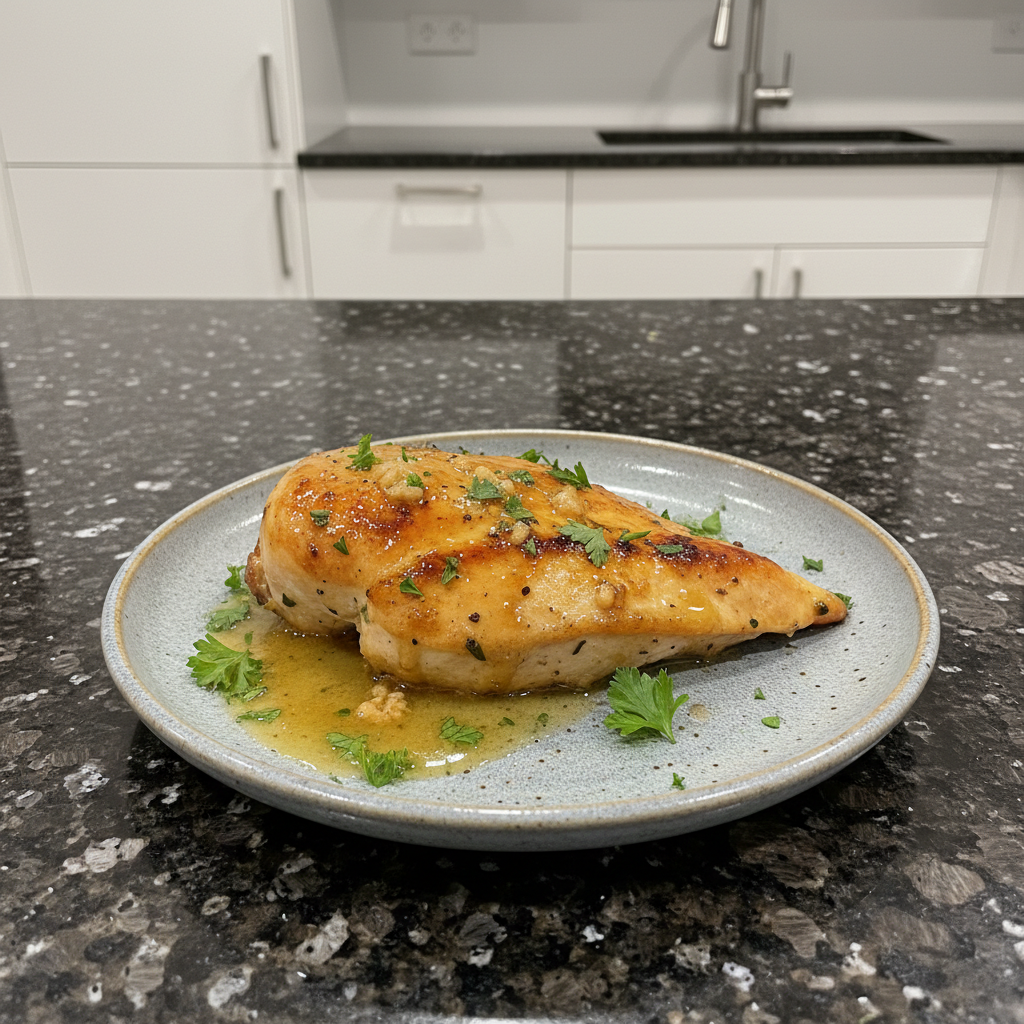
There is nothing quite like the aroma of a delicious meal wafting through your kitchen, especially on a busy weeknight. I understand the challenge of finding a simple yet satisfying dinner that everyone will love. That is exactly why I am thrilled to share my ultimate recipe for Garlic Butter Baked Chicken. This dish is your new go-to for tender, flavorful chicken every time. I will show you how to achieve perfect doneness and reveal a secret to an even richer garlic butter sauce that will transform your weeknight dinners.
Why You’ll Love This Recipe
My Garlic Butter Baked Chicken recipe stands out because it guarantees a consistently tender and juicy result, banishing dry chicken forever. It is also incredibly easy and quick, making it the perfect solution for a flavorful weeknight meal that the whole family will adore. This recipe delivers that coveted buttery, aromatic garlic, tender, juicy chicken experience.
The secret weapon here is my unique Smoked Brown Butter Infusion. We are not just melting butter; we are browning it to a beautiful beurre noisette state. This process introduces a wonderfully complex, nutty, and toasted flavor profile that elevates the classic garlic butter to new heights. For an extra layer of depth, I love to add smoked paprika, which brings a subtle, smoky nuance to the sauce. To ensure maximum moisture and prevent the butter from separating, I sometimes use a cold-sear start or add a splash of chicken stock to the skillet before baking. This creates a glorious, emulsified pan sauce that coats every inch of the chicken, keeping it incredibly moist and tender from bottom to top.
Ingredients Needed

- 3 boneless skinless chicken breasts
- salt and black pepper
- 1/2 + 1/4 teaspoon paprika
- 4 tbsp butter (melted)
- 1 teaspoon Italian seasoning
- 1 tablespoon fresh parsley (chopped)
- 2 cloves of garlic (minced)
- 1 tbsp. olive oil (extra virgin)
Ingredient Notes & Substitutions
Chicken Breasts: When selecting boneless skinless chicken breast, aim for pieces of similar size and thickness. If your chicken breasts are uneven, I recommend pounding the thicker parts slightly to achieve uniform thickness. This ensures even cooking. Always adhere to USDA guidelines for safe handling.
Butter: The quality of your butter truly shines in this recipe. Fresh, unsalted butter is ideal for achieving that perfect brown butter effect. While butter is central to the flavor, if you need a dietary substitution, a high-quality olive oil could be used, but note that the distinct nutty flavor of brown butter will be lost.
Garlic: For that essential aromatic punch, fresh garlic is non-negotiable. Please avoid jarred minced garlic as it lacks the vibrant flavor needed for this dish.
Paprika: The recipe calls for paprika, but I highly recommend using smoked paprika. It wonderfully enhances the ‘smoked’ aspect of our unique twist, contributing significantly to flavor optimization.
Herbs: Fresh parsley adds a bright, herbaceous note, beautifully complementing the Italian seasoning. These herbs contribute to a truly vibrant flavor.
Dietary Considerations: This Garlic Butter Baked Chicken recipe is naturally keto-friendly and gluten-free, making it a versatile option for many dietary needs.

How to Make Garlic Butter Baked Chicken
- Preheat your oven to 400°F.
- Season the chicken breasts generously with salt, black pepper, and 1/2 teaspoon of paprika. Set them aside for a moment.
- In a small bowl, combine the remaining 1/4 teaspoon of paprika, the melted butter, Italian seasoning, fresh chopped parsley, and minced garlic. Stir well and set this aromatic garlic butter mixture aside.
- Place a cast iron skillet over medium heat and add the olive oil. Once the skillet is hot and the oil shimmers, carefully add the seasoned chicken breasts. Sear them for about 1-2 minutes per side, until they develop a beautiful golden crust. You will hear a delightful sizzle and see the Maillard reaction beginning to work its magic.
- Pour the prepared garlic butter mixture evenly over the seared chicken breasts in the skillet.
- Transfer the skillet to the preheated oven and bake for approximately 20 minutes, or until the chicken breasts reach an internal temperature of 165°F. Using an instant-read thermometer is key for juicy results.
- Remove the skillet from the oven. Using a spoon, generously pour some of the delicious butter sauce left in the skillet over the chicken breasts. If you wish, you can top with extra fresh herbs before serving for an additional burst of flavor.
Mastering Perfect Chicken Doneness & Texture
Achieving perfectly cooked chicken is simpler than you think, and an instant-read thermometer is your best friend here. While USDA guidelines recommend cooking chicken to an internal temperature of 165°F for safety, I have found that for maximum juiciness, it is best to pull the chicken from the oven when it reaches about 160°F. This accounts for carry-over cooking, where the chicken continues to cook outside the oven, allowing it to reach a perfect 165°F during its resting period and preventing dryness.
When it comes to timing, the size of your chicken breasts matters. Thin breasts will cook much faster than jumbo-sized breasts. Rather than relying on fixed times, always use your instant-read thermometer to check the thickest part of the breast. This ensures your chicken is never undercooked or overcooked.
If your chicken ever comes out rubbery, it is likely due to overcooking, which dries out the proteins and makes them tough and stringy. Sometimes, rubbery chicken can also be a result of ‘woody breast syndrome,’ a quality issue found in some chicken. You can avoid overcooking by precisely monitoring the internal temperature and by ensuring proper searing techniques, which lock in moisture.
Pro Tips & Troubleshooting
Pro Tips
Implement the Brown Butter Infusion: To create our signature smoked brown butter infusion, start by melting your butter in a small saucepan over medium-low heat. Continue cooking, swirling occasionally, until the butter browns, develops a nutty aroma, and small brown flecks appear at the bottom. This is beurre noisette. Remove from heat, then mix in the minced garlic, Italian seasoning, fresh parsley, and smoked paprika. This layered flavor is truly incredible.
Prepping for Success: Always pat your boneless skinless chicken breast completely dry with paper towels before seasoning and searing. This is crucial for achieving a superior Maillard reaction and a beautiful golden crust, which locks in flavor and moisture.
Don’t Skip the Rest: After baking, let your chicken rest for 5-10 minutes on a cutting board or in the skillet. This allows the juices to redistribute throughout the meat, ensuring every bite is incredibly tender and moist. This is a vital step for juice retention.
Equipment Matters: For the best sear and most even cooking, I highly recommend using a cast iron skillet. If you do not have one, any oven-safe skillet or baking dish will work, though the sear might be slightly different.
Flavor Boost: For a bright, zesty counterpoint to the rich garlic butter, consider adding a teaspoon of fresh lemon zest to your butter mixture. It adds a lovely acidity that really makes the flavors pop.
Common Mistakes to Avoid
Over-baking: This is the most common culprit for dry, stringy chicken. Do not rely solely on visual cues; an instant-read thermometer is your most reliable tool. Pull the chicken when it is just right, knowing it will continue to cook a bit as it rests.
Burnt Garlic: While we want perfectly seared chicken, burnt garlic is bitter and unpleasant. Keep an eye on your heat during the searing phase. Ensure your garlic is well mixed into the butter sauce, as this provides a protective layer and allows it to infuse rather than burn.
Flipping During Baking: There is no need to flip the chicken once it is in the oven. This can cause the flavorful butter coating to fall off, and it does not contribute to better cooking for this recipe.
Jarred Minced Garlic: As I mentioned earlier, for that truly aromatic punch, fresh garlic cloves are superior. Jarred versions often contain preservatives and lack the bright, pungent flavor we are aiming for.
Serving & Storage
Serving Ideas
This Garlic Butter Baked Chicken is incredibly versatile. For a light and healthy meal, I love serving it with roasted asparagus or a fresh broccoli salad. If you are craving comfort food, it pairs beautifully with creamy mashed potatoes or a rich polenta. For those following keto-friendly or low-carb diets, cauliflower rice or zucchini noodles make excellent accompaniments. If you have leftovers, they are fantastic sliced or shredded for a quick chicken noodle soup or a hearty white chicken chili. For another quick and easy chicken dish, consider our one-pot chicken Florentine.
Storage and Make-Ahead
To store cooked chicken, allow it to cool completely, then transfer it to an airtight container. It will keep well in the refrigerator for 3-4 days. For longer storage, you can freeze leftover chicken and sauce in freezer-safe bags or containers for up to 2-3 months. When reheating, I aim for methods that retain moisture, such as gently warming it in the oven with a splash of broth, or a brief, gentle reheat in the microwave. Using glass storage containers can also help maintain freshness.
Conclusion
I hope this comprehensive guide inspires you to create truly exceptional Garlic Butter Baked Chicken in your own kitchen. This recipe, with its incredible ease, irresistible flavor, and the unique brown butter infusion, promises to be a game-changer for your weeknight meals. Even if you are a beginner cook, the expert tips provided will empower you to achieve tender, juicy results every time. I encourage you to try this recipe, experiment with different serving ideas, and share your delicious creations. Be sure to explore my other recipes for more culinary inspiration!
FAQ
Do I need to cover the chicken with foil while baking?
Generally, no. Covering baked chicken breasts is not usually needed for this recipe. We want to achieve a nice sear and browning on top. If you notice the top browning too quickly, you can loosely tent it with foil for the last few minutes of baking.
How long do I bake 6 oz chicken breasts at 400°F?
For chicken breasts around 6 ounces, baking at 400°F will typically take between 18-22 minutes. However, I strongly emphasize using an instant-read thermometer to confirm an internal temperature of 160°F before resting. Chicken thickness can vary greatly, so the thermometer is your most reliable guide for perfect doneness.
Why did my chicken come out rubbery?
Rubbery chicken is usually a sign of over-baking, which dries out the meat and makes it tough. It can also be a result of “woody breast syndrome,” a condition in some chicken. To avoid this, always rely on your instant-read thermometer and pull the chicken at 160°F to allow for carry-over cooking to 165°F.
Can I make this recipe in an air fryer?
Yes, you can adapt this recipe for an air fryer. You will likely need to adjust the temperature and cooking time. A general guideline is 375°F for 15-20 minutes, flipping halfway. The initial sear might not be as pronounced as in a skillet, but the chicken will still be flavorful. If you love using your air fryer for sides, try our crispy air fryer zucchini fries.
How do I store and reheat leftovers effectively?
Store cooked chicken in an airtight container in the refrigerator for 3-4 days. To reheat without drying it out, place it in an oven-safe dish with a splash of chicken broth or water, cover loosely with foil, and warm at 300°F until heated through. You can also gently reheat in the microwave.
Can I use chicken tenders instead of full breasts?
Yes, you can absolutely use chicken tenders. Keep in mind that tenders are smaller and will cook much faster, typically 10-15 minutes at 400°F. Again, the best way to ensure perfect doneness is to use an instant-read thermometer.
How do I prevent the garlic from burning in the oven?
The key is to ensure the garlic is thoroughly mixed into the butter sauce. This mixture acts as a protective layer, allowing the garlic to infuse its flavor without burning. Also, avoid excessively high heat during the initial sear, as this can scorch the garlic too quickly.
Garlic Butter Baked Chicken
Ingredients
Equipment
Method
- Preheat your oven to 400°F.
- Season the chicken breasts generously with salt, black pepper, and 1/2 teaspoon of paprika. Set them aside for a moment.
- In a small bowl, combine the remaining 1/4 teaspoon of paprika, the melted butter, Italian seasoning, fresh chopped parsley, and minced garlic. Stir well and set this aromatic garlic butter mixture aside.
- Place a cast iron skillet over medium heat and add the olive oil. Once the skillet is hot and the oil shimmers, carefully add the seasoned chicken breasts. Sear them for about 1-2 minutes per side, until they develop a beautiful golden crust.
- Pour the prepared garlic butter mixture evenly over the seared chicken breasts in the skillet.
- Transfer the skillet to the preheated oven and bake for approximately 20 minutes, or until the chicken breasts reach an internal temperature of 165°F. Using an instant-read thermometer is key for juicy results.
- Remove the skillet from the oven. Using a spoon, generously pour some of the delicious butter sauce left in the skillet over the chicken breasts. If you wish, you can top with extra fresh herbs before serving for an additional burst of flavor.