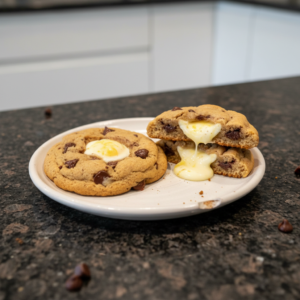
As spring awakens and the days grow longer, my kitchen always feels a renewed sense of joy and the urge to create something truly special for Easter gatherings. There is nothing quite like the delight of sharing homemade treats, especially when they are perfectly portioned and undeniably adorable. These easter egg cheesecake bites mini are just that: a delightful blend of creamy indulgence and festive charm, designed to make your holiday celebrations even sweeter. I am here to guide you through a reliable recipe with all the practical tips you need for success, promising perfectly portioned, irresistibly cute mini cheesecakes that are much easier to make than their full-sized counterparts. Get ready for a unique flavor profile that will set these apart on any dessert table.
Why You’ll Love These Salted Malted Easter Egg Cheesecake Bites
I adore these mini cheesecakes because they offer a sophisticated twist on a classic dessert. The ‘Salted Malted’ profile is truly a game-changer. Imagine a shortbread crust with a subtle hint of sea salt, creating a beautiful contrast to the sweet, creamy filling. Then, the magic happens within the cheesecake itself, where malted milk powder introduces a nostalgic, deeper dairy flavor. This echoes classic malted Easter candies, like Whoppers Robin Eggs, giving each bite a complex and memorable taste that goes beyond a standard vanilla cheesecake.
The reasoning behind this unique flavor combination is simple yet brilliant. A touch of salt in the crust balances the overall sweetness of the cheesecake and the chocolate eggs, enhancing every other flavor present. Malted milk powder, on the other hand, amplifies the richness of the cream cheese, adding an earthy, toasty note that makes the cheesecake filling incredibly satisfying and distinctive.
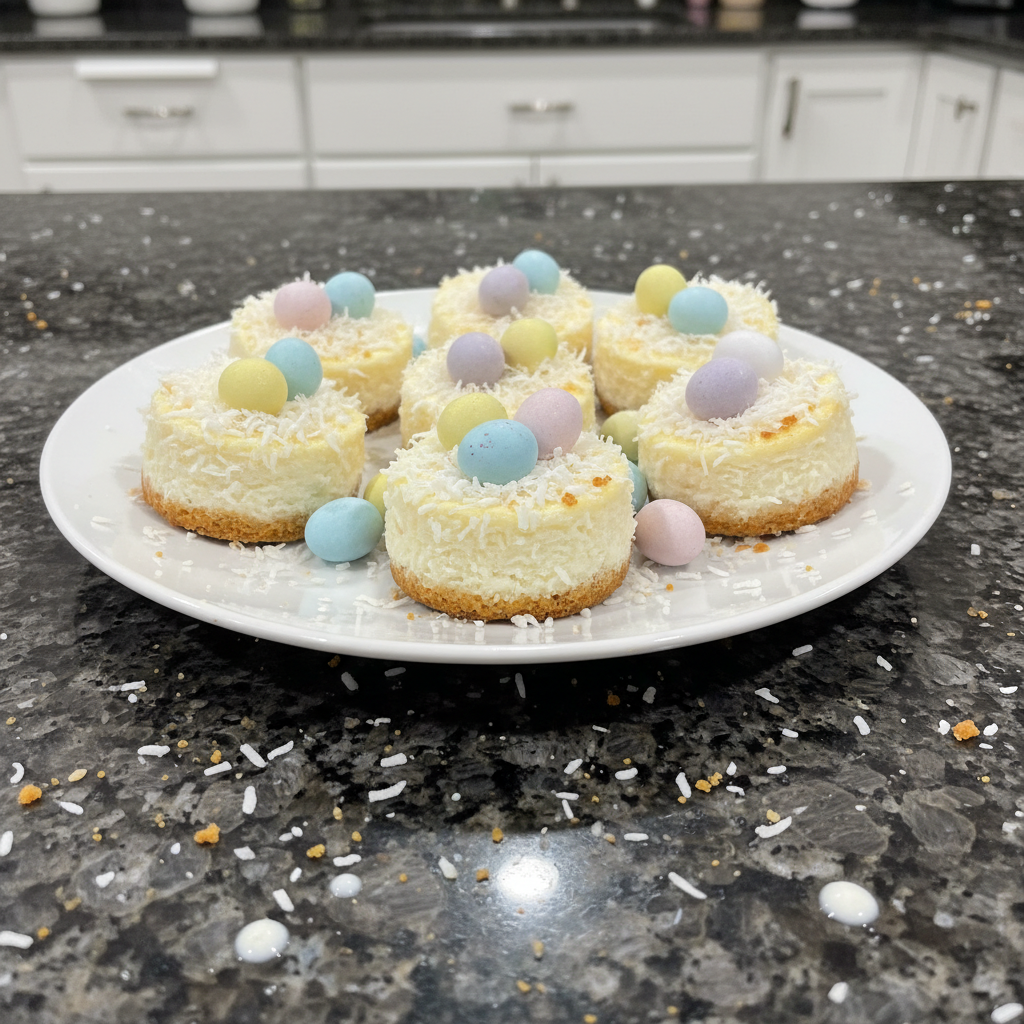
Festive and Adorable: These mini cheesecakes are absolutely perfect for Easter gatherings, easily garnished to create a charming ‘bird’s nest’ look with Cadbury Mini Eggs.
Portion Control: Being mini, they are ideal for individual servings, meaning no fuss with slicing and serving a large cheesecake.
Easier Baking: You will find these less prone to cracking than their larger counterparts, and the simplified cooling steps make them a breeze to bake.
Crowd-Plea: With their unique flavor profile, blending classic comfort with a gourmet touch, these Salted Malted Easter Egg Cheesecake Bites are sure to appeal to everyone.
Ingredients Needed
Here is exactly what you will need to create these delightful mini cheesecakes.
For the Crust:
- 5 ounces shortbread cookies (such as Lorna Doone)
- 2 tablespoons unsalted butter (melted)
For the Filling:
- 16 ounces cream cheese (softened (brick-style, full fat))
- ¾ cup granulated sugar
- ⅓ cup sour cream
- 2 large eggs (at room temp)
- 2 teaspoons lemon juice
- 1 teaspoon vanilla extract
For the Topping:
- ½ cup heavy cream
- 2 tablespoons powdered sugar
- 1 tablespoon instant cheesecake pudding mix (dry*)
- ½ cup sweetened shredded coconut
- Mini Cadbury eggs (as desired for garnishing)
Ingredient Notes & Substitutions
Getting the right ingredients is key to cheesecake perfection.
Cream Cheese: Always use full-fat cream cheese that comes in a brick-style package. This type has less water content and provides the best structure and creamy texture for your cheesecake. Avoid tub-style spreadable cream cheese, as it contains more air and water, which will negatively impact your cheesecake’s consistency.
Room Temperature Ingredients: It is absolutely crucial for your cream cheese and eggs to be at optimal temperature, around 65-70°F or 18-21°C. This allows for proper aeration and emulsification, ensuring your batter is silky smooth and free of lumps. Cold ingredients can lead to overmixing as you try to combine them, incorporating too much air and resulting in cracks.
Pudding Mix: The instant pudding mix in the whipped cream acts as a fantastic stabilizer. It helps the heavy cream hold its fluffy texture for much longer without deflating.
Sour Cream: This ingredient is a secret weapon in cheesecake baking. Sour cream adds a lovely tang, moisture, and tenderizes the cheesecake, contributing to its rich and smooth texture.
Substitutions:
Crust: If you prefer a more traditional tangy base, graham cracker crumbs can be substituted for shortbread cookies. Just ensure the quantity remains the same.
Pudding Mix: If instant cheesecake flavor pudding mix is not available, instant vanilla pudding mix will work just as well to stabilize your whipped cream topping.
Coconut: The toasted coconut adds a wonderful texture and helps create that charming ‘bird’s nest’ aesthetic. However, if you have allergy considerations or simply prefer not to use it, you can certainly skip the toasted coconut.
Fat-Free Cream Cheese: I strongly advise against using fat-free cream cheese for this recipe. It has a significantly higher water content and will not provide the same rich, firm, and creamy texture that is characteristic of a truly great cheesecake.
How to Make Easter Egg Cheesecake Bites
Follow these steps carefully, and you will have beautiful easter egg cheesecake bites mini in no time.
Prepare for Baking
Preheat your oven to 350F. Line two standard cupcake tins with cupcake liners for a total of 18 cheesecakes, then set them aside.
Craft the Shortbread Crust
Add the shortbread cookies to a food processor and pulse until very fine crumbs form, resembling fine sand. Add the melted butter to the crumbs and process again until everything is fully combined and the mixture resembles wet sand.
Fill each cupcake liner with 1 tablespoon of the crust mixture. Gently press the mixture evenly against the bottom of each liner using the back of a spoon or your fingers to form a compact base.
Mix the Creamy Filling
In a large bowl, using an electric mixer, or in a stand mixer fitted with a whisk attachment, cream together the softened cream cheese and granulated sugar until the mixture is completely smooth. Be sure to scrape down the sides of the bowl as needed to ensure everything is well combined. Add the sour cream, room temperature eggs, lemon juice, and vanilla extract to the cream cheese mixture. Beat just until smooth. Be careful not to overbeat the eggs, as this can incorporate too much air.
Bake the Mini Cheesecakes
Measure 3-4 tablespoons of the silky smooth filling into each of the prepared cupcake liners, leaving about ¼ inch of space from the top.
Bake for 25 minutes. Once the baking time is complete, turn off the oven, crack the oven door open slightly, and leave the cheesecakes inside for an additional 45 to 60 minutes. This slow, gradual cooling process allows the cheesecakes to set evenly and prevents cracking.
Chill Thoroughly
After the cheesecakes have cooled completely to room temperature inside the oven, transfer them to the refrigerator. Allow them to fully chill in the fridge for at least 1 hour before proceeding. This chilling time is crucial for the cheesecake’s molecular structure to set properly.
Prepare Toppings
Before serving, prepare the whipped cream topping. In a large bowl, using an electric mixer or a stand mixer fitted with the whisk attachment, whip the heavy cream, powdered sugar, and instant pudding mix together until the mixture is fluffy and holds soft peaks. Set this aside.
Toast the coconut for a golden brown color and delightful crunch. Spread the sweetened shredded coconut on a parchment or Silpat-lined baking sheet. Place it under the broiler on low for 2 to 3 minutes. You must keep a very close eye on it, as coconut is prone to burning very quickly! Once golden, remove from the oven and allow the toasted coconut to cool completely.
Assemble and Serve
Pipe dollops of the fluffy whipped cream mixture onto the tops of the thoroughly chilled cheesecakes, or simply spoon it on. Then, sprinkle generously with the toasted coconut and artfully arrange Cadbury mini chocolate eggs as desired for a charming “bird’s nest” effect.
Crust & Pan Pointers: Perfecting Your Mini Cheesecake Base
A great cheesecake starts with a fantastic crust, and your choice of tools can make a big difference.
No Food Processor? No Problem!
If you do not have a food processor, you can still achieve consistently fine crumbs for your shortbread cookies. Simply place the shortbread cookies in a sturdy Ziploc bag, squeeze out any excess air, and seal it. Then, use a rolling pin or the bottom of a heavy glass to crush the cookies until they form fine crumbs. The key is consistency; ensure all crumbs are fine for a stable and even crust.
Choosing Your Muffin Pan: Metal vs. Silicone
The type of muffin tin you use can subtly impact your mini cheesecakes.
Metal Pans: Standard metal muffin pans offer excellent, even heat distribution, which helps create a crispier crust. You will definitely need cupcake liners when using metal pans to prevent sticking and make removal easy. This recipe is optimized for a standard-sized muffin pan.
Silicone Pans: Silicone muffin pans are known for their non-stick properties and ease of removal, often without the need for liners if greased well. However, silicone does not conduct heat as efficiently as metal, which might result in a slightly softer crust or require minor adjustments to bake times. If you opt for a silicone pan, keep an eye on your cheesecakes and be prepared for them to potentially need a minute or two longer to bake or set. While this recipe uses a standard-sized muffin pan, if you consider a mini-muffin pan, be aware that bake times will be significantly reduced, likely to 15-20 minutes.
Pro Tips & Troubleshooting
Even seasoned bakers can benefit from a few expert insights. Here are my top tips and common mistakes to avoid for perfect mini cheesecakes every time.
Pro Tips for Success
Achieving the Salted Malted Twist: To elevate these beyond a standard mini cheesecake, here is how to incorporate our unique twist. Add 1/2 teaspoon of fine sea salt to your shortbread crust mixture along with the melted butter. For the filling, whisk in 1 tablespoon of malted milk powder with the cream cheese and sugar, ensuring it is fully incorporated for that nostalgic, rich flavor.
Room Temperature Cream Cheese: I cannot stress this enough. Truly room temperature cream cheese (around 65-70°F) is essential to prevent any lumps in your cheesecake batter. This allows it to blend smoothly with other ingredients, creating a homogeneous and creamy filling.
Stabilizing Whipped Cream: The instant pudding mix is your best friend here. It acts as a stabilizer for the heavy cream, ensuring your whipped topping stays fluffy and does not deflate, even after sitting out for a bit.
Toasting Coconut: For perfectly toasted coconut without burning, spread the shredded coconut thinly on a parchment or Silpat-lined baking sheet. Place it under the broiler on low heat. Watch it continuously for 2 to 3 minutes; it can go from golden to burnt in seconds! Remove promptly once it achieves a light, golden brown.
Perfect “Bird’s Nest” Garnish: To achieve that charming bird’s nest effect, pipe or spoon your whipped cream topping into a circular shape, creating a small well in the center. Then, strategically place a generous sprinkle of toasted coconut around the edges to form the nest, and gently nestle a few Cadbury mini eggs in the center.
Common Mistakes to Avoid
Overbeating Eggs: When adding your eggs to the cream cheese mixture, beat them just until they are combined and the mixture is smooth. Overbeating the eggs incorporates too much air into the batter, which can cause your cheesecakes to puff up excessively during baking and then collapse or crack as they cool.
Rushing the Chilling Process: Chilling time is not just a suggestion; it is critical. Allowing the mini cheesecakes to fully chill in the refrigerator helps their molecular structure set, preventing a soft or soupy texture. Resist the urge to serve them too early.
Adding Topping Too Early: While tempting, adding the whipped cream and garnishes too far in advance can lead to them softening, especially the crispness of the toasted coconut. Add your toppings just before serving for the freshest appearance and best texture.
Using Tub Cream Cheese: As mentioned in the ingredient notes, tub-style spread cream cheese has a higher water content and more air. This will result in a cheesecake that is less dense, less creamy, and generally not the desired consistency for a baked cheesecake. Stick to brick-style, full-fat cream cheese.
Serving & Storage
These mini cheesecakes are truly a delight to serve, and knowing how to store them properly will ensure they remain delicious.
Serving Ideas
Garnish for Impact: The key to making these easter egg cheesecake bites mini shine is the garnish. Focus on creating that charming “bird’s nest” look using Cadbury Mini Eggs nestled amongst the toasted coconut. It instantly elevates their festive appeal.
Optimal Temperature: For the best texture and firmness, always advise serving these cheesecakes cold, directly from the refrigerator. Their creamy filling and firm crust are at their peak when chilled.
Pairings: These rich and sweet bites pair wonderfully with a light spring tea or a freshly brewed coffee. The slight bitterness of coffee can beautifully cut through the sweetness of the cheesecake.
Storage and Make-Ahead
Refrigeration: Store any leftover mini cheesecakes in an airtight container in the refrigerator for up to 3-4 days. If you are preparing them ahead of time, consider managing crust moisture by storing the whipped cream, toasted coconut, and Cadbury mini eggs separately, then assembling just before serving. This keeps the crust from getting too soft.
Freezing: Yes, you can freeze mini cheesecakes! It is best to freeze them without any toppings. Wrap each individual cheesecake tightly in plastic wrap, then place them in an airtight container or a freezer bag. They can be stored in the freezer for up to 1 month. To thaw, simply transfer them to the refrigerator overnight or for several hours until fully defrosted, then add your toppings.
Make-Ahead: These cheesecakes are an excellent make-ahead dessert. You can prepare and bake them a day or two in advance and store them, chilled, in the refrigerator. Just before your guests arrive, add the delicate whipped cream, toasted coconut, and Cadbury mini eggs for ultimate freshness and visual appeal. For more convenient, no-bake truffle-style treats, explore our other recipes.
Conclusion
These Salted Malted Easter Egg Cheesecake Bites Mini truly encapsulate the joy of spring and festive baking. Their ease of preparation, combined with their undeniable charm and especially the unique Salted Malted flavor profile, makes them a standout dessert for any Easter celebration. With all the expert tips I have shared, even beginner bakers can achieve beautiful, perfectly set, and utterly delicious results. Do not hesitate to experiment with the optional Salted Malted enhancement; I promise it is worth the extra step! I encourage you to print this recipe, share it with friends and family, and perhaps explore some of the other delightful spring dessert recipes on my blog, like these easy bunny Oreo balls. Happy baking!
FAQ
Why should I use room temperature eggs and cream cheese?
Room temperature ingredients, ideally around 65-70°F, emulsify much better, resulting in a smooth, lump-free batter for your cheesecake. Cold ingredients tend to resist blending, leading to lumps of unmixed cream cheese and potentially requiring overmixing, which can incorporate too much air.
How do I prevent the mini cheesecakes from cracking on top?
The “Cracked Door Cooling Method” is key. After baking, turn off your oven, crack the door open, and allow the cheesecakes to cool slowly inside for 45-60 minutes. This gradual temperature change prevents rapid contraction, which is the main cause of cracks and sinking. Also, be careful not to overbeat the eggs, as too much air can contribute to cracking.
Can I make these Easter cheesecake bites in advance?
Yes, these mini cheesecakes are excellent for make-ahead preparation. You can bake them up to 2-3 days ahead of time and store them in an airtight container in the refrigerator. For the freshest look and texture, add the whipped cream, toasted coconut, and Cadbury mini eggs just before serving.
Do I need a water bath for mini cheesecakes?
No, a water bath is generally not necessary for mini cheesecakes. Their smaller size, combined with the cracked-door cooling method, effectively prevents cracking and ensures even baking without the added fuss of a water bath.
What is the best way to toast coconut without burning it?
The broiler-toast coconut method is very effective. Spread the shredded coconut thinly on a parchment or Silpat-lined baking sheet. Place it under a low broiler for 2 to 3 minutes, watching it continuously, as coconut browns very quickly. Remove it as soon as it reaches a light golden color.
How do I prevent my mini cheesecakes from sticking to the liners?
Ensure you are using standard cupcake liners. For an extra measure of security, especially if you plan to remove the cheesecakes from their liners for presentation, a light spray of baking non-stick spray inside each liner can be very helpful.
How long can I store mini cheesecakes in the freezer?
Mini cheesecakes, without their toppings, can be frozen for up to 1 month. Wrap each cheesecake individually in plastic wrap, then place them in an airtight container or freezer bag to prevent freezer burn. Thaw them in the refrigerator before adding fresh toppings.
Salted Malted Easter Egg Cheesecake Bites Mini: Easy Recipe
Ingredients
Equipment
Method
- Preheat your oven to 350F. Line two standard cupcake tins with cupcake liners for a total of 18 cheesecakes, then set them aside.
- Add the shortbread cookies to a food processor and pulse until very fine crumbs form, resembling fine sand. Add the melted butter and sea salt to the crumbs and process again until everything is fully combined and the mixture resembles wet sand.
- Fill each cupcake liner with 1 tablespoon of the crust mixture. Gently press the mixture evenly against the bottom of each liner using the back of a spoon or your fingers to form a compact base.
- In a large bowl, using an electric mixer, or in a stand mixer fitted with a whisk attachment, cream together the softened cream cheese, granulated sugar, and malted milk powder until the mixture is completely smooth. Be sure to scrape down the sides of the bowl as needed to ensure everything is well combined.
- Add the sour cream, room temperature eggs, lemon juice, and vanilla extract to the cream cheese mixture. Beat just until smooth. Be careful not to overbeat the eggs, as this can incorporate too much air.
- Measure 3-4 tablespoons of the silky smooth filling into each of the prepared cupcake liners, leaving about ¼ inch of space from the top.
- Bake for 25 minutes. Once the baking time is complete, turn off the oven, crack the oven door open slightly, and leave the cheesecakes inside for an additional 45 to 60 minutes. This slow, gradual cooling process allows the cheesecakes to set evenly and prevents cracking.
- After the cheesecakes have cooled completely to room temperature inside the oven, transfer them to the refrigerator. Allow them to fully chill in the fridge for at least 1 hour before proceeding. This chilling time is crucial for the cheesecake's molecular structure to set properly.
- Before serving, prepare the whipped cream topping. In a large bowl, using an electric mixer or a stand mixer fitted with the whisk attachment, whip the heavy cream, powdered sugar, and instant pudding mix together until the mixture is fluffy and holds soft peaks. Set this aside.
- Toast the coconut for a golden brown color and delightful crunch. Spread the sweetened shredded coconut on a parchment or Silpat-lined baking sheet. Place it under the broiler on low for 2 to 3 minutes. You must keep a very close eye on it, as coconut is prone to burning very quickly! Once golden, remove from the oven and allow the toasted coconut to cool completely.
- Pipe dollops of the fluffy whipped cream mixture onto the tops of the thoroughly chilled cheesecakes, or simply spoon it on. Then, sprinkle generously with the toasted coconut and artfully arrange Cadbury mini chocolate eggs as desired for a charming "bird's nest" effect.