There’s something truly magical about a classic strawberry shortcake. It brings back memories of summer picnics and sweet, simple pleasures. But what if we could elevate that nostalgic dessert into a stunning layer cake, perfect for any gathering? My Strawberry Shortcake Cake (Best Ever) recipe is exactly that solution. It’s for those who crave more than a humble biscuit but desire something lighter than a dense pound cake. We also have an equally delightful recipe for strawberry shortcake cookies that captures these same simple pleasures. I am here to guide you step-by-step to create a tender sponge that stays moist and a whipped cream that truly won’t melt, ensuring a show-stopping dessert every single time.
Why You’ll Love This Recipe
This Strawberry Shortcake Cake stands out from the crowd for several delightful reasons. I’ve incorporated a few chef’s secrets to ensure it’s not just good, but the best ever.
The unique twist: I recommend brushing the cake layers with a light Elderflower-Lemon simple syrup. This optional but highly recommended step cuts beautifully through the creaminess and amplifies the fresh berry aroma. It adds a subtle floral, acidic note that truly makes the flavors sing.
Texture and taste: You will find the perfect bite here. The combination of a tender vanilla crumb with my special Stabilized Whipped Cream creates a light, airy, yet remarkably stable cake. Each forkful is pure bliss.
Sturdy structure: Thanks to my cream cheese stabilization method, this cake holds up beautifully. It resists melting even in warmer weather, making it ideal for outdoor events.
Make-ahead friendly: Unlike traditional shortcake biscuits that can harden, this Sponge Cake actually improves slightly. The flavors meld together wonderfully as it rests, making it a fantastic make-ahead dessert.
Ingredients Needed

Gathering your ingredients correctly is the first step to success in my kitchen. Here is everything you will need for this magnificent cake:
2½ cups all purpose flour (spooned and leveled)
3 teaspoons baking powder
½ teaspoon salt
1¾ cups granulated sugar
½ cup vegetable or canola oil
2 large eggs (room temperature)
2 large egg whites (room temperature)
2½ teaspoons pure vanilla extract
½ teaspoon almond extract (optional, but highly recommended)
⅔ cup sour cream
¾ cup milk (preferably whole or 2%, room temperature)
3 cups sliced or diced fresh strawberries (divided)
2 tablespoons strawberry jam
additional whole strawberries (for garnish, optional)
For the Stabilized Whipped Cream Frosting:
8 ounces cream cheese (softened to cool room temp)
1 cup powdered sugar
¾ teaspoon vanilla extract
2¼ cups heavy whipping cream (really cold, straight from the fridge)
Ingredient Notes & Substitutions
Sponge Cake Base: Using room temperature eggs and sour cream is crucial for the moisture and structure of your Sponge Cake. It creates a better emulsion, leading to a fluffier crumb. The almond extract, though optional, truly is a secret bakery flavor that perfectly complements fresh strawberries.
Strawberries: Always choose the freshest, most vibrant seasonal strawberries you can find for the best flavor. We use a combination of strawberry jam and fresh berries. The jam helps to Macerated Strawberries, drawing out their juices into a natural sauce without making them mushy, a key part of our Strawberry Preparation.
Stabilized Whipped Cream: Full-fat cream cheese is not just for flavor here; it acts as a powerful Stabilized Whipped Cream agent. This is what gives our Chantilly Cream frosting its incredible stability, ensuring your beautiful layer cake won’t collapse, even in warmer environments.

How to Make Strawberry Shortcake Cake (Best Ever)
Let’s get baking! Follow these steps carefully, and you will achieve a Strawberry Shortcake Cake (Best Ever) that impresses everyone.
Step 1: Mix the Batter
First, preheat your oven to 350°F. In a medium bowl, whisk together the all purpose flour, baking powder, and salt until they are well combined. Set this dry mixture aside. Now, in a stand mixer fitted with the paddle attachment (my preference) or with a hand mixer, beat the granulated sugar, vegetable or canola oil, large eggs, egg whites, and pure vanilla and almond extracts until they are fully combined and slightly lightened. Mix in the sour cream until it is just incorporated. Next, add half of your whisked flour mixture, beating only until it is just combined. While still mixing, slowly pour in the milk, then add the remaining flour mixture. Make sure to scrape down the sides and bottom of the bowl as needed. The key here is not to overmix once the flour is added, as this can develop gluten too much and lead to a dense, rubbery cake. You want a smooth, light, and airy batter.
Step 2: Bake the Layers
Prepare three 8-inch cake pans by lining them with Parchment Paper and greasing them lightly. Evenly divide your beautiful cake batter among the three prepared pans. Gently tap or drop the pans on your countertop a couple of times. This helps to release any trapped air bubbles, ensuring an even bake. Bake for 18-22 minutes, or until a wooden toothpick inserted into the center of a cake layer comes out completely clean. For consistent results and even browning, I often rotate my pans halfway through the baking time. Once baked, place the pans on a wire rack and allow the cakes to cool completely. This is crucial; a warm cake will melt your frosting, leading to a messy assembly.
Step 3: Macerate the Strawberries
While your cakes are cooling, prepare your Macerated Strawberries. In a medium bowl, combine the sliced or diced fresh strawberries with the strawberry jam. Gently stir them together. Set this mixture aside. I typically slice about 2½ cups of strawberries for the cake filling and dice about ½ cup for the top of the cake, but you can choose your preferred cut. The jam works wonders by drawing out the natural juices from the berries, creating a beautiful, glossy sauce without making the berries too soft or mushy. This process is part of achieving perfectly prepared strawberries for our Strawberry Shortcake Cake (Best Ever).
Step 4: Whip the Frosting
Now, let’s create that glorious Stabilized Whipped Cream frosting. In a large mixing bowl, combine the softened cream cheese, powdered sugar (also known as Confectioners’ Sugar), and ¾ teaspoon of vanilla extract. Using a stand mixer with a whisk attachment (my preference) or a hand mixer, beat this mixture on medium speed until it is perfectly smooth and lump-free. With the mixer still running on medium, slowly pour the really cold Heavy Whipping Cream down the side of the bowl. It is paramount that your cream is straight from the fridge and very cold; this helps it whip up properly. Periodically stop the mixer to scrape down the bottom and sides of the bowl. Increase the speed to high and continue whipping until the cream holds stiff peaks. If you’re using a hand mixer, try to hold the bowl near the top and avoid holding it against your body, as body heat can warm the cream and hinder whipping.
Step 5: Assembly
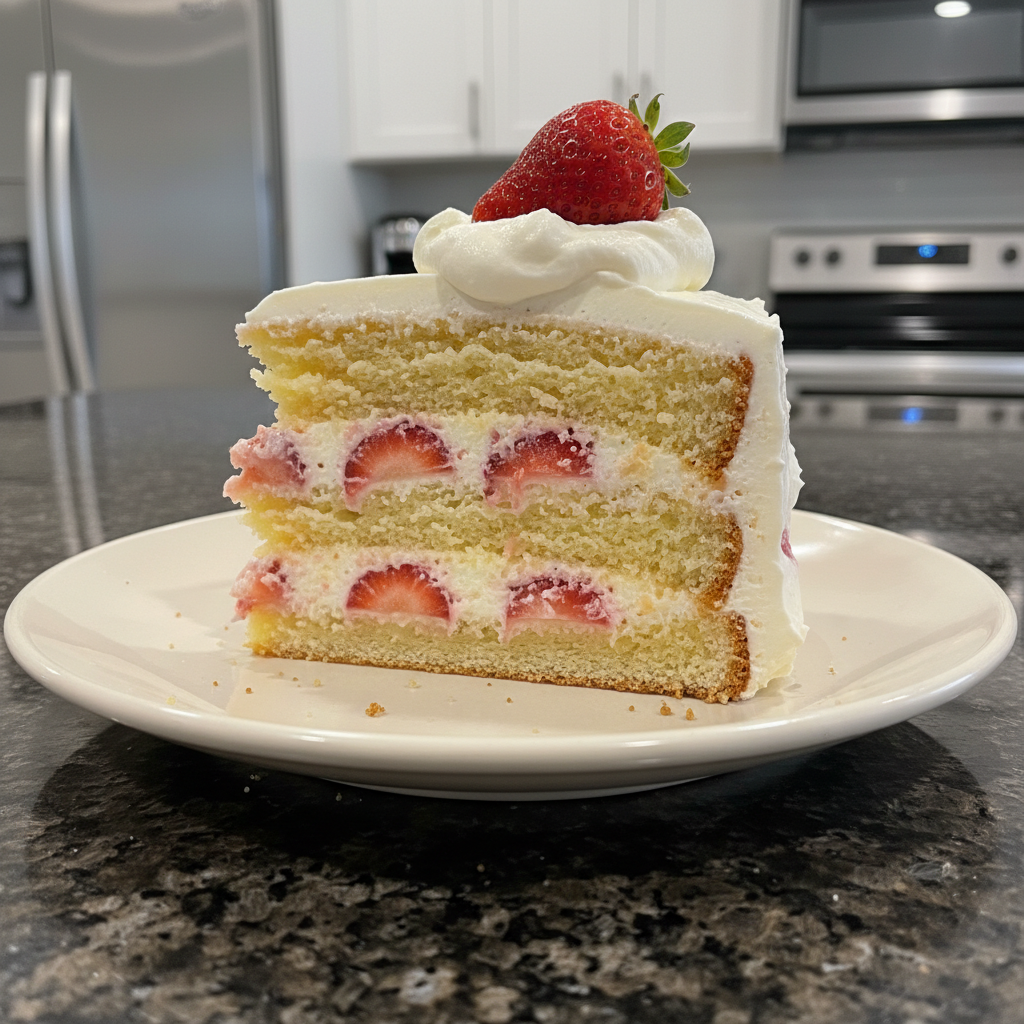
It’s time for the grand finale! Place your first cooled cake layer on your serving platter. Spread one-third of the glorious frosting evenly over the top, then arrange about 1¼ cups of your Macerated Strawberries over the frosting. Gently place the second cake layer on top and repeat the frosting and strawberry layers. For the third and final cake layer, spread the remaining whipped cream frosting over the top. Then, artistically arrange the remaining strawberries in the center of the cake. If you wish, you can decorate the outside of the cake with additional whole strawberries for an extra touch of beauty. This cake also looks stunning with a rustic, “Naked Cake” appeal, where the layers of cake and filling are visible through a thin, artful layer of frosting.
Avoiding the “Soggy Bottom”: Strawberry Science
One of the most common concerns with fresh strawberry cakes is preventing a “soggy bottom” or juice runoff. I have a proven method to help you avoid those weeping strawberries.
Berry Prep timing: We intentionally mix the strawberries with jam just before assembly, rather than hours ahead. This is because the process of osmosis would cause the berries to release too much water if left sitting for an extended period, leading to a much wetter filling. Timing is everything in our Strawberry Preparation.
The moisture barrier: To create an effective barrier against the berry juices, apply a thin layer of your Stabilized Whipped Cream frosting directly onto the cake sponge. This acts as a protective shield before you add the juicy Macerated Strawberries. This simple step prevents the strawberry juice from soaking into your tender Sponge Cake layers, keeping your cake firm and delicious.
Pro Tips for a Bakery-Style Finish
Achieving a professional-looking cake is all about the details. Here are my expert tips to ensure your Strawberry Shortcake Cake (Best Ever) looks like it came straight from a gourmet bakery.
Expert Success Tips
Room Temperature Ingredients: Room temperature eggs and milk are vital for a light, airy Sponge Cake. If you forget to take them out ahead of time, simply place eggs in a bowl of warm water for 5 minutes, and microwave milk for about 15 seconds until it is no longer cold.
Chantilly Cream Technique: When whipping your Heavy Whipping Cream, stop immediately once stiff peaks form. Over-whipping can quickly turn your beautiful Chantilly Cream into butter, and that’s not what we want for this cake.
Flat Layers: For a professional, even stack, consider using cake strips around your pans during baking. Alternatively, you can level the tops of your cooled cake layers with a serrated knife for perfectly flat surfaces before assembly. This makes frosting much easier and the final cake visually appealing.
Common Mistakes to Avoid
Overmixing: Never overmix your cake batter once the flour has been added. This develops gluten, resulting in a dense, rubbery cake texture rather than a tender Sponge Cake.
Warm Cream: Heavy Whipping Cream must be very cold to whip properly into a stable frosting. If your cream is warm, it simply will not achieve stiff peaks, and your frosting will be runny.
Assembly Rush: Always ensure your cake layers are completely cooled before you begin assembly. Attempting to frost and layer a warm cake will lead to melted frosting and a potential cake disaster.
Serving & Storage
How to Store Leftovers
This Strawberry Shortcake Cake (Best Ever) contains fresh fruit and cream cheese, so proper storage is essential. Store any leftovers in an airtight container in the refrigerator. It will keep beautifully for 2-3 days.
For longer storage, unfrosted cake layers can be wrapped tightly and frozen for up to 3 months. However, I do not recommend freezing the fully assembled cake. The fresh strawberries will release too much water upon thawing, compromising the texture and integrity of your delicious cake.
Serving Ideas
For the best flavor experience, I suggest serving this cake at a cool room temperature. Take it out of the refrigerator about 20 minutes before serving. This allows the flavors to truly bloom while maintaining the stability of the frosting.
For an extra touch of elegance, pair a slice of this cake with a glass of chilled Prosecco. Or, for a family-friendly option, a refreshing homemade strawberry lemonade makes a delightful companion.
Conclusion
My Strawberry Shortcake Cake (Best Ever) truly combines the ease of a simple recipe with the exquisite taste and appearance of a scratch-made bakery item. With its tender Sponge Cake layers, juicy Macerated Strawberries, and my secret Stabilized Whipped Cream, this cake is destined to become a summer favorite. The good news is that the stabilized cream makes it forgiving, even for beginners. I encourage you to try this recipe in your kitchen!
I would love to see your creations. Please rate this recipe and share your photos on social media.
Frequently Asked Questions
How do I keep the cake from getting soggy?
To prevent sogginess, combine your strawberries with jam just before assembly, not hours in advance. Also, spread a thin layer of frosting directly onto the cake sponge before adding the berries. This creates a barrier against their juices.
What is the best way to stabilize whipped cream for a layer cake?
In this recipe, we use softened cream cheese. It acts as an excellent stabilizer for Heavy Whipping Cream, allowing it to hold its shape beautifully without collapsing, even on a layer cake.
Can I substitute the almond extract if I have an allergy?
Absolutely. If you have an almond allergy or simply prefer not to use it, you can simply double the amount of vanilla extract or add a tiny splash of lemon extract for a bright note.
How should I store leftovers of a strawberry shortcake cake?
Store any leftover Strawberry Shortcake Cake in an airtight container in the refrigerator. It will stay fresh and delicious for 2-3 days.
Why is it important to use room temperature ingredients for the batter?
Using room temperature eggs, sour cream, and milk ensures a smooth, well-emulsified batter. This leads to a finer, more tender crumb in your Sponge Cake, resulting in a lighter and fluffier texture.
Can I make this without sour cream?
Yes, you can substitute the sour cream with an equal amount of full-fat plain Greek yogurt. It will provide a similar moisture and tang to the cake batter.
Strawberry Shortcake Cake (Best Ever) with Stabilized Cream
Ingredients
Equipment
Method
- Preheat your oven to 350°F. In a medium bowl, whisk together the all purpose flour, baking powder, and salt until well combined. Set this dry mixture aside.
- In a stand mixer fitted with the paddle attachment (or with a hand mixer), beat the granulated sugar, vegetable or canola oil, large eggs, egg whites, and pure vanilla and almond extracts until fully combined and slightly lightened.
- Mix in the sour cream until just incorporated. Next, add half of your whisked flour mixture, beating only until just combined. Slowly pour in the milk while still mixing, then add the remaining flour mixture. Scrape down the sides and bottom of the bowl as needed. Do not overmix once flour is added, as this can lead to a dense cake. You want a smooth, light, and airy batter.
- Prepare three 8-inch cake pans by lining them with parchment paper and greasing them lightly. Evenly divide your cake batter among the three prepared pans.
- Gently tap the pans on your countertop a couple of times to release any trapped air bubbles, ensuring an even bake.
- Bake for 18-22 minutes, or until a wooden toothpick inserted into the center of a cake layer comes out completely clean. Rotate pans halfway through baking for consistent results. Once baked, place the pans on a wire rack and allow the cakes to cool completely. A warm cake will melt your frosting.
- While your cakes are cooling, prepare your macerated strawberries. In a medium bowl, combine the sliced or diced fresh strawberries with the strawberry jam. Gently stir them together. Set this mixture aside. The jam helps draw out natural juices from the berries, creating a beautiful sauce without making them too soft or mushy.
- In a large mixing bowl, combine the softened cream cheese, powdered sugar, and ¾ teaspoon of vanilla extract. Using a stand mixer with a whisk attachment (or a hand mixer), beat this mixture on medium speed until perfectly smooth and lump-free.
- With the mixer still running on medium, slowly pour the really cold heavy whipping cream down the side of the bowl. It is paramount that your cream is straight from the fridge and very cold; this helps it whip up properly. Periodically stop the mixer to scrape down the bottom and sides of the bowl.
- Increase the speed to high and continue whipping until the cream holds stiff peaks. Do not over-whip, or it can turn into butter.
- Place your first cooled cake layer on your serving platter. Spread one-third of the frosting evenly over the top. Arrange about 1¼ cups of your macerated strawberries over the frosting. Gently place the second cake layer on top and repeat the frosting and strawberry layers.
- For the third and final cake layer, spread the remaining whipped cream frosting over the top. Artistically arrange the remaining strawberries in the center of the cake. If desired, decorate the outside of the cake with additional whole strawberries for an extra touch of beauty.