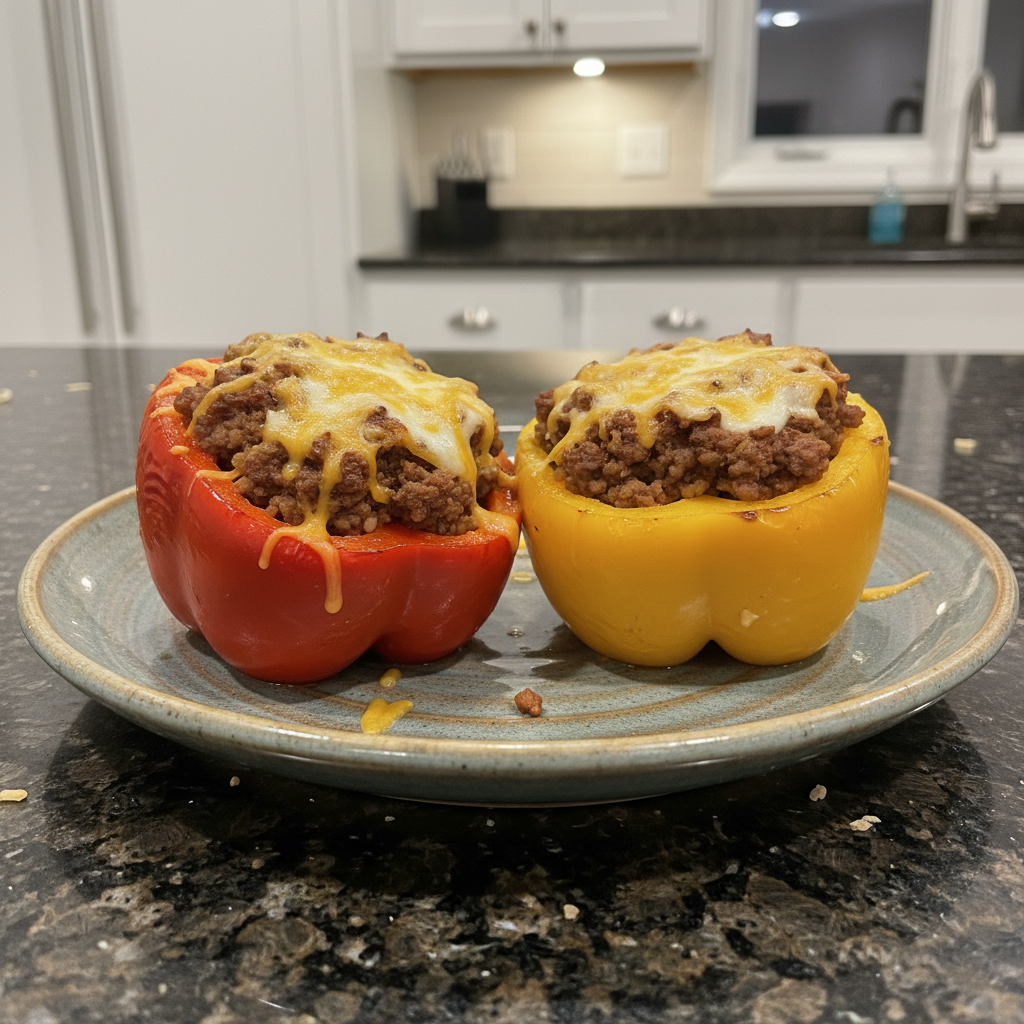
There’s nothing quite like a plate of warm, savory stuffed peppers to bring a smile to everyone’s face. It’s the ultimate comfort food, a hearty and satisfying meal that conjures up memories of home cooking. If you love the flavors of stuffed peppers but prefer a spoonable meal, check out our easy stuffed pepper soup. But I’m here to let you in on a little secret: my recipe for Classic Beef Stuffed Peppers takes this beloved dish to a whole new level of deliciousness. Get ready for an easy, flavorful dinner that will become a staple in your kitchen, thanks to a simple, game-changing technique for ultimate juiciness.
Why You’ll Love This Recipe
In my kitchen, I’m always looking for ways to elevate classic dishes, and these beef stuffed peppers are a testament to that philosophy. The unique twist here isn’t just a sauce for serving; it’s a rich, savory tomato-beef broth that infuses the peppers with incredible flavor as they bake. This isn’t just about moisture; it’s about creating a harmonious blend where the bell peppers, the ground beef filling, and the seasoned broth become one delicious experience.
* Ultimate Moistness: Baking the bell peppers in a rich tomato-beef broth is the secret weapon. It ensures every bite of your ground beef and rice filling is incredibly juicy and prevents the peppers from drying out, while also tenderizing them beautifully.
* Family-Friendly: This is a dinner recipe that appeals to all ages. It’s comforting, customizable, and a fantastic way to get everyone around the table for a hearty, wholesome meal.
* Comfort Food Classic: While my twist enhances the flavor, it stays true to the cozy, satisfying essence of traditional stuffed peppers. It’s the perfect blend of familiar tastes with an elevated touch. For another beloved family-friendly comfort food, consider our baked spaghetti recipe.
Ingredients Needed

- 4-6 bell peppers use any color – green, yellow, red, orange
- 1 tablespoon olive oil
- 1 lb ground beef 450g – you can also use ground turkey, chicken, pork, sausage, tofu, or other similar
- 1 medium onion chopped
- 1 jalapeno pepper chopped (optional, for spicy)
- 5 cloves garlic chopped
- 14.5 ounces fire roasted tomatoes (canned – or use diced tomatoes or tomato sauce)
- 1 cup shredded cheese cheddar, mozzarella, or a blend – I LOVE pepperjack for myself
- 1 tablespoon paprika
- 1 teaspoon dried oregano
- 1 teaspoon dried basil
- Salt and pepper to taste
- 1 cup cooked rice white, brown, or wild rice
- For Garnish. Fresh chopped parsley, red pepper flakes
Ingredient Notes & Substitutions
- Bell Peppers: When choosing your bell peppers, look for ones that are firm, shiny, and free of blemishes. Any color works beautifully; green offers a slightly more peppery bite, while red, yellow, and orange bell peppers are sweeter. Using a mix of colors adds wonderful visual appeal to your plate!
- Ground Meat: While ground beef is classic, feel free to experiment! Ground turkey, ground chicken, or even ground pork are excellent leaner alternatives. For an extra flavor boost, try Italian sausage, chorizo, or a blend. For a vegetarian option, seasoned tofu, black beans, or a hearty umami-rich lentil soup can be used. Different fat percentages in meat will impact flavor and juiciness, so choose according to your preference.
- Tomatoes: Fire roasted tomatoes add a lovely smoky depth, but diced tomatoes or plain tomato sauce work perfectly as alternatives. If you’re not a fan of tomatoes, you can replace them entirely by pureeing roasted red peppers with a splash of vegetable or beef stock for a rich, sweet base.
- Cheese: Cheddar cheese and mozzarella cheese are always reliable choices for their melty goodness. For a delightful spicy kick, I absolutely adore using pepperjack cheese in my filling. Dairy-free shredded cheese options are also readily available for those with dietary restrictions.
- Rice: Cooked rice is essential for binding the filling. White rice provides a classic soft texture, while brown rice offers a nuttier flavor and more chew. Wild rice can add a unique texture and earthy taste. Ensure your rice is cooked and cooled slightly before mixing to prevent overcooking in the peppers.
- Worcestershire Sauce: For an even richer, umami depth, I highly recommend adding 1-2 teaspoons of Worcestershire sauce to your ground beef filling. It truly enhances the savory notes!

How to Make Classic Beef Stuffed Peppers
Creating these delicious Classic Beef Stuffed Peppers is a rewarding experience, and I’ll walk you through each step to ensure perfect results.
Phase 1: Prepare the Peppers and Oven
- Preheat your oven to a robust 425°F (220°C). At the same time, bring a large pot of water to a rolling boil – enough to comfortably submerge your bell peppers.
- Wash the bell peppers thoroughly. Carefully slice off their tops and scoop out the seeds and any white membrane inside. To help your peppers stand upright in the baking dish, you can gently slice a small, flat portion off the bottom of each pepper. (Don’t discard those bell pepper tops! Finely chop them to add extra flavor to your filling later.)
- Blanch the prepared bell peppers in the boiling water for about 5 minutes. This step is crucial as it slightly softens the peppers, ensuring they become beautifully tender during baking and aren’t unpleasantly crunchy. Alternatively, you can roast them in the oven for about 20 minutes to achieve the same softening effect.
- Lightly oil a baking dish large enough to hold all your softened peppers snugly. This prevents sticking and helps them cook evenly.
Phase 2: Craft the Flavorful Filling
- In a large pan, heat 1 tablespoon of olive oil over medium heat. Add the chopped onion, the reserved chopped bell pepper tops, and the chopped jalapeno (if you’re craving a bit of heat!). Sauté for about 5 minutes until the vegetables soften and become aromatic.
- Add the 5 cloves of chopped garlic to the pan and cook for just 1 minute more, stirring constantly, until the garlic becomes wonderfully fragrant. Be careful not to let it brown too much.
- Add the 1 lb of ground beef to the pan. Break it apart with a spoon as it cooks for 5-6 minutes, until it’s browned and cooked through. Drain any excess fat if necessary.
- Stir in the 14.5 ounces of fire roasted tomatoes, the 1 tablespoon of paprika, 1 teaspoon of dried oregano, 1 teaspoon of dried basil, and season generously with salt and pepper to taste. The aroma of these spices as they hit the warm pan is absolutely incredible! Add the 1 cup of cooked rice and stir everything together until well combined, then remove the pan from the heat.
- Finally, stir in half of the 1 cup of shredded cheese (cheddar, mozzarella, or your favorite blend) until it’s just incorporated into the warm filling.
Phase 3: Assemble and Bake to Perfection
- Now for the fun part: stuffing! Carefully fill each blanched bell pepper with the savory meat filling mixture. Don’t overstuff; leave a little room at the top. Once filled, generously top each pepper with the remaining shredded cheese.
- In the lightly oiled baking dish, arrange your stuffed peppers. Now, for my signature twist: pour 1.5 cups of beef broth and the remaining 1/2 can of fire roasted tomatoes into the bottom of the baking dish around the peppers. This creates a rich, simmering liquid base that will keep your peppers incredibly moist and infuse them with even more delicious flavor. You’ll notice the sauce taking on a beautiful rustic, reddish-orange hue.
- Roast the stuffed peppers in your preheated oven for 15-20 minutes. Keep an eye on them until the peppers are tender to your preference and the cheese on top is beautifully melted, bubbly, and golden brown.
- Once baked, let them cool slightly to set. Garnish with fresh chopped parsley and a sprinkle of red pepper flakes, then serve immediately. Enjoy the juicy, flavorful results!
Achieving Perfectly Tender Peppers
One of the most common disappointments with stuffed peppers is biting into a crunchy, undercooked bell pepper. I assure you, we can avoid that! The key to perfectly tender peppers lies in softening them *before* they even hit the oven with their delicious filling.
* Why Pre-Softening Matters: Bell peppers have a relatively firm texture. If you stuff and bake them raw, the filling can overcook and dry out before the pepper itself softens sufficiently. Pre-softening ensures an even cook and a delightful, yielding texture that complements the tender ground beef and rice.
* Blanching: As instructed in the recipe, blanching the peppers for 5 minutes in boiling water is an excellent method. This quick dip helps break down the cellular structure of the pepper, making it more pliable and speeding up its cooking time in the oven.
* Roasting: Another fantastic alternative is to roast the empty bell peppers. Place them cut-side down on a baking sheet and roast at 400°F (200°C) for about 15-20 minutes, or until they start to soften. This can also add a subtle roasted flavor.
* Microwaving (Quick Method): For a super quick softening method, place the cut bell peppers in a microwave-safe dish with a tablespoon or two of water, cover, and microwave on high for 3-5 minutes, or until just tender. This is especially handy if you’re short on time.
* Common Mistake: The biggest mistake is skipping this step entirely. Don’t fall into the trap of stuffing raw peppers and expecting them to magically become tender in the oven. A little prep here goes a long way!
Pro Tips & Troubleshooting
Here are some insights from my kitchen to help you master these Classic Beef Stuffed Peppers and avoid common pitfalls.
Pro Tips
- Utilize Pepper Tops: Don’t throw away those bell pepper tops! Finely chop them and cook them with the onion and garlic in the filling for added flavor and zero waste.
- Adjust for Pepper Size: Bell pepper sizes can vary significantly. You might need 4 large peppers or up to 6 smaller ones. If you have leftover filling, it’s delicious on its own or can be frozen for a quick future meal.
- Don’t Overstuff: Resist the urge to pack the filling in too tightly. Leaving a little room at the top ensures even cooking and prevents the filling from spilling out during baking.
- Check Internal Temp: While the ground beef is pre-cooked, if you’re ever concerned about the internal temperature of the entire filling after baking, a meat thermometer should read 165°F (74°C).
- Boost Flavor with Worcestershire: For an even richer, deeper flavor profile, stir a splash (1-2 teaspoons) of Worcestershire sauce into your ground beef filling.
- Prevent Tipping: To ensure your peppers stand tall and proud, slice a small, flat portion off the bottom of each pepper. This creates a stable base and prevents them from toppling over in the baking dish.
- Snug Fit: Arrange your stuffed peppers snugly in the baking dish. This helps them support each other, preventing any accidental tipping. If your peppers are smaller, consider using a slightly smaller baking dish.
Common Mistakes to Avoid
- Not Softening Peppers: This is the cardinal sin! Insufficiently softened peppers before baking will result in a tough, crunchy texture that clashes with the tender filling. Always blanch or roast them first.
- Discarding Pepper Tops: As mentioned, those chopped tops add flavor and reduce food waste. Don’t toss them!
- No Flat Bottom: Failing to slice a small portion off the bottom of the peppers is a recipe for wobbly, unstable peppers that can spill their precious filling.
- Overcooking the Filling: Since the ground beef is cooked before stuffing, be mindful not to overbake, which can lead to a dry, crumbly texture. The baking time is primarily for tenderizing the pepper and melting the cheese.
- Too Much Rice: Using an excessive amount of rice can make the filling dense and bland. Stick to the recommended ratio for a balanced flavor and texture.
Serving & Storage
These Classic Beef Stuffed Peppers are a complete meal on their own, but a few simple additions can truly elevate the experience.
Serving Ideas
- Garnish Galore: A sprinkle of fresh chopped parsley adds a vibrant pop of color and freshness, while red pepper flakes can introduce a pleasant gentle heat.
- Creamy Topping: A dollop of sour cream or Greek yogurt on top provides a lovely cool contrast to the warm, savory filling.
- Perfect Pairings: For side dishes, I love to serve these peppers with a simple green salad with a light vinaigrette, some roasted vegetables like asparagus or broccoli, a chunk of crusty bread to sop up that delicious tomato-beef broth, or even a warm bowl of creamy tomato soup.
- Spice It Up: For those who love extra heat, a side of homemade pickled jalapeños or a drizzle of your favorite hot sauce (like Cholula) can be fantastic.
Storage and Make-Ahead
- Leftovers: Any leftover stuffed peppers can be stored in an airtight container in the refrigerator for up to 5 days. They make for excellent meal prep!
- Reheating: To reheat, place them in an oven preheated to 350°F (175°C) for 15-20 minutes, or until warmed through. You can also microwave them, but adding a splash of extra beef broth or water before reheating helps maintain their moisture.
- Freezing: Stuffed peppers freeze beautifully! You can freeze them cooked or uncooked.
- Cooked: Allow them to cool completely. Wrap each pepper individually in plastic wrap, then aluminum foil, and place in a freezer-safe bag or container. They will last for 2-3 months.
- Uncooked: Prepare the peppers and filling as usual, stuff them, but do not bake. Wrap and freeze as described above.
To reheat from frozen, bake cooked peppers (uncovered, or covered loosely with foil) at 350°F (175°C) for 45-60 minutes, adding a little broth to the dish. For uncooked frozen peppers, thaw overnight in the refrigerator, then bake as directed in the recipe.
Conclusion
There you have it – my recipe for incredibly juicy, flavorful, and satisfying Classic Beef Stuffed Peppers. Thanks to that secret ingredient – the rich tomato-beef broth baking sauce – you’ll enjoy a dish that’s moist, tender, and packed with savory goodness. It’s a testament to how a small tweak can transform a beloved comfort food into something truly exceptional. Even if you’re a beginner cook, you’ll find this recipe straightforward and rewarding. Don’t hesitate to experiment with different fillings, cheeses, or seasonings to make it your own! I encourage you to print this recipe, share it with friends, and let these beef stuffed peppers become a delicious new tradition in your home.
FAQ
What’s the best way to prepare bell peppers for stuffing?
The best way to ensure tender bell peppers is to pre-soften them before stuffing and baking. You can blanch them in boiling water for 5 minutes, or roast them in the oven at 400°F (200°C) for about 20 minutes until they begin to soften.
Can I substitute the ground beef with other meats or make it vegetarian?
Absolutely! Ground beef is classic, but you can easily use ground turkey, chicken, pork, or even Italian sausage. For a vegetarian option, seasoned tofu, lentils, or black beans make excellent substitutes.
How can I adjust the spice level of my stuffed peppers?
To adjust the spice level, you can include or omit the chopped jalapeño pepper. You can also add red pepper flakes to the filling or use a spicy cheese like pepperjack for an extra kick.
What are some serving suggestions for classic stuffed peppers?
Stuffed peppers are a complete meal! They pair wonderfully with a simple green salad, roasted vegetables, or crusty bread to soak up the delicious tomato-beef broth. Garnish with fresh parsley and a dollop of sour cream or Greek yogurt.
How do I store and reheat leftover stuffed peppers?
Store leftover stuffed peppers in an airtight container in the refrigerator for up to 5 days. To reheat, warm them in the oven at 350°F (175°C) for 15-20 minutes, or microwave, adding a splash of broth or water to maintain moisture.
What if I don’t like tomatoes in my stuffed peppers?
If you’re not a fan of tomatoes, you can replace the fire-roasted tomatoes in the filling and broth with pureed roasted red peppers blended with a little vegetable or beef stock for a sweet, savory alternative.
Can I freeze stuffed peppers?
Yes, you can freeze both cooked and uncooked stuffed peppers for 2-3 months. Wrap them individually in plastic wrap and then foil. Thaw uncooked peppers overnight in the refrigerator before baking. Cooked peppers can be reheated from frozen, covered, in the oven until warmed through.
How do I keep my stuffed peppers from tipping over?
To prevent your stuffed peppers from tipping, carefully slice a small, thin portion off the bottom of each pepper. This creates a flat base, allowing them to stand upright and stable in your baking dish.
Classic Beef Stuffed Peppers
Ingredients
Equipment
Method
- Preheat your oven to a robust 425°F (220°C). At the same time, bring a large pot of water to a rolling boil – enough to comfortably submerge your bell peppers.
- Wash the bell peppers thoroughly. Carefully slice off their tops and scoop out the seeds and any white membrane inside. To help your peppers stand upright in the baking dish, you can gently slice a small, flat portion off the bottom of each pepper. (Don't discard those bell pepper tops! Finely chop them to add extra flavor to your filling later.)
- Blanch the prepared bell peppers in the boiling water for about 5 minutes. This step is crucial as it slightly softens the peppers, ensuring they become beautifully tender during baking and aren't unpleasantly crunchy. Alternatively, you can roast them in the oven for about 20 minutes to achieve the same softening effect.
- Lightly oil a baking dish large enough to hold all your softened peppers snugly. This prevents sticking and helps them cook evenly.
- In a large pan, heat 1 tablespoon of olive oil over medium heat. Add the chopped onion, the reserved chopped bell pepper tops, and the chopped jalapeno (if you're craving a bit of heat!). Sauté for about 5 minutes until the vegetables soften and become aromatic.
- Add the 5 cloves of chopped garlic to the pan and cook for just 1 minute more, stirring constantly, until the garlic becomes wonderfully fragrant. Be careful not to let it brown too much.
- Add the 1 lb of ground beef to the pan. Break it apart with a spoon as it cooks for 5-6 minutes, until it's browned and cooked through. Drain any excess fat if necessary.
- Stir in the 14.5 ounces of fire roasted tomatoes, the 1 tablespoon of paprika, 1 teaspoon of dried oregano, 1 teaspoon of dried basil, and season generously with salt and pepper to taste. The aroma of these spices as they hit the warm pan is absolutely incredible! Add the 1 cup of cooked rice and stir everything together until well combined, then remove the pan from the heat.
- Finally, stir in half of the 1 cup of shredded cheese (cheddar, mozzarella, or your favorite blend) until it's just incorporated into the warm filling.
- Now for the fun part: stuffing! Carefully fill each blanched bell pepper with the savory meat filling mixture. Don't overstuff; leave a little room at the top. Once filled, generously top each pepper with the remaining shredded cheese.
- In the lightly oiled baking dish, arrange your stuffed peppers. Now, for my signature twist: pour 1.5 cups of beef broth and the remaining 1/2 can of fire roasted tomatoes into the bottom of the baking dish around the peppers. This creates a rich, simmering liquid base that will keep your peppers incredibly moist and infuse them with even more delicious flavor. You'll notice the sauce taking on a beautiful rustic, reddish-orange hue.
- Roast the stuffed peppers in your preheated oven for 15-20 minutes. Keep an eye on them until the peppers are tender to your preference and the cheese on top is beautifully melted, bubbly, and golden brown.
- Once baked, let them cool slightly to set. Garnish with fresh chopped parsley and a sprinkle of red pepper flakes, then serve immediately. Enjoy the juicy, flavorful results!